


ROUTINE MAINTENANCE and TECHNICAL
Periodically check to ensure that your system is clean.
Periodically check the pilot and burner. Check to see that
all the burner ports are clean and clear. Check the pilot
head for blockage. Check to ensure the pilot flame is blue
with no yellow tips.
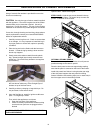
OPENING THE DOOR
Turn unit off and wait until the appliance has cooled down.
Open the lower louver panel. Undo the three bolts at the
bottom corners and center of the door. Swing door out,
then lift up and out to remove.
Ensure the door is properly fastened after cleaning before
attempting to re-light the appliance.
CLEANING THE GLASS
DO NOT CLEAN GLASS WHEN HOT
It will be necessary to clean the ceramic glass periodically.
During a cold start up, condensation will sometimes form
on the glass, this is a normal condition with all gas
fireplaces and stoves. However, this condensation can
allow dust and lint to cling to the glass surface. Initial paint
curing of the appliance can leave behind a slight film on
the glass. This is a temporary problem. It is therefore
recommended that the glass be cleaned initially after
about the first two weeks of use.
To clean the door use a mild glass cleaner and a soft
cloth. Abrasive cleaners will damage the glass and gold
surfaces.
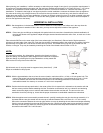
TO REPLACE DOOR GLASS
The glass in this appliance is ceramic. If the glass is
damaged or broken a factory replacement must be fitted.
TO REPLACE:
• Open door, remove the glass carefully.
• Install the new piece of glass with the large bulb in the
gasket tape against the unit. Place the joint in the
tape in a bottom corner. Close door
Glass must be purchased from an Envirogas dealer.
No substitute materials are allowed.
CLEANING THE INSIDE OF THE FIREBOX
Remove the log carefully from the firebox. Gently remove
the embers and place on a piece of paper towel. Until
ready to replace.
Vacuum the bottom of the firebox thoroughly. Carefully
clean off any dust on the logs and brick panels and
remove any lint from the main burner and pilot burner.
After carefully replacing the log and embers in their correct
positions, and the door has been resealed, re-light the
pilot, following the instructions on the attached label.
CLEARANCES MUST BE SUFFICIENT TO ALLOW
ACCESS FOR MAINTENANCE AND SERVICE
Depending upon the amount of use, cleaning should be
required no more than two or three times per season.
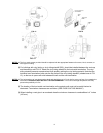
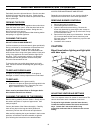
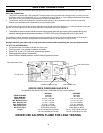
REMOVING BURNER CONTROLS:
1. Shut of gas supply to appliance.
2. Disconnect gas line from the valve.
3. Open the door and remove the log. Remove the
burner tray assembly by removing the two screws on
either side of the tray. Pull tray up at the back, lift tray
out and towards the front.
4. Remove the brick panel as per instructions. Undo the
(6) six screws that hold the burner control tray onto
the base of the unit. Lift the control tray, up on the left
side and pull out.
5. Installation is the reverse
CAUTION:
Bleed lines before lighting and light pilot
with door open
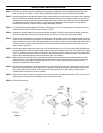
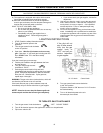
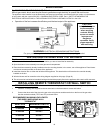
ADJUSTING VENTURI AIR SETTINGS
There is a separate venturi air shutter for each burner The
venturis have been set for installation at sea level.
To adjust for high altitude: open the lower louvers,
Locate the venturis between the burner and control
trays. Loosen the 2 set screws with a long
screwdriver and rotate the air shutters to the correct
setting.
16