


- 37 -
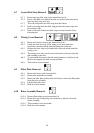
6.11 Tub Removal
6.11.1 Remove the drawer front as per instructions in 6.1.
6.11.2 Remove the wiring cover as per instructions in 6.8.
6.11.3 Disconnect the fill hose from the dispenser (water may drip)
6.11.4 Disconnect the mains harness and chassis harness connectors from
the electronic controller.
6.11.5 Unclip the drain hose cuff from the motor assembly.
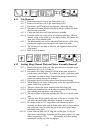
6.11.6 From the under side of the tub now unclip the drain hose, fill hose
and the wiring looms which go to the link assembly. Disconnect the
earth wire off the element plate.
6.11.7 The link assembly can now be unhooked from the rear of the tub by
pressing the spigots back through the tub connection point.
6.11.8 The tub may now be lifted at the front and slipped forward off the
slide runners.
6.11.9 Refit in reverse manner.
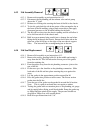
6.12 Locking Ring, Element Plate and Motor Assembly Removal
6.12.1 Remove the drawer front, tub, filter plate and rotor assembly as per
instructions in 6.1,6.9, 6.10 & 6.11.
6.12.2 Disconnect the wiring connectors off the heater plate and motor
(mark motor wire location). To release the motor connections push
a fine blade screwdriver down alongside the wiring connection to
release the locking barb on the terminal.
6.12.3 Disconnect the rotor position sensor from the motor housing.
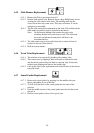
6.12.4 While lifting the tab on the locking ring, rotate the ring anticlockwise
until it comes free of tub tabs.
6.12.5 This also releases the motor housing from the locking ring.
6.12.6 Holding the pump housing on the motor assembly lift the locking
ring, heating plate and motor clear of the tub.
6.12.7 The suction pipe of the drain molding will slide out of the tub drain
area.
6.12.8 You may now lift the locking ring clear of the motor assembly. This
will allow the heater plate and motor assembly to come apart
6.12.9 Be careful of the two ‘O’ rings which seal between the motor
assembly and heater plate and the heater plate and tub, these and the
tub sealing area must be clean and put in the correct place before
reassembly takes place.
6.12.10 Check both the drain cuff ‘O’ ring and suction pipe ‘O’ ring for
deformation and damage. Lubricate and if necessary replace ‘O’ rings
before reassembly.6.12.11 Reassemble in reverse manner
ensuring all locking ring tabs are engaged.