


- 38 -
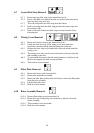
6.13 Lid Assembly Removal
6.13.1 Remove tub assembly as per instructions in 6.11
6.13.2 Disconnect the lid plumbing off the exhaust valve and air pump
above the ‘Y’ joint.
6.13.3 Release two locking tabs securing the front of the lid to the chassis.
6.13.4 To do this, push back the tab in the center of the rectangular slot at
the front of the lid molding, using a blade screwdriver, then apply
downward pressure to the lid while holding the tab back.
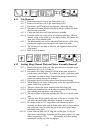
6.13.5 The lid will now drop into the chassis opening and this will allow it
to be slid forward out of the chassis area.
6.13.6 Refit in reverse manner being careful not to damage the seal when
fitting the lid in through the chassis. Ensure the location tab at the
right rear of the lid locates to the right of the rear chassis support.
Note: The bottom lid has a strengthening bar at the rear.
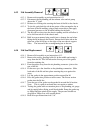
6.14 Lid Seal Replacement
6.14.1 Remove Lid assembly as per instructions 6.13.
6.14.2 Remove the seal by grasping hold of it in the middle and easing it
away from the lid. This will release the fir tree part of the gasket
from the retaining slot.
6.14.3 Ease the gasket away from the air plumbing connector joint at the
rear of the lid.
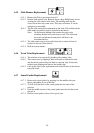
6.14.4 Fit the new up to the shoulder on the plumbing connection. Slide
both ends of the lid seal into place ensuring they rest against the
stops.
6.14.5 Lay the gasket in the approximate position around the lid.
6.14.6 Press the gasket into position at each corner. The fir tree section
pushes into the lid slot.
6.14.7 Now the rest of the gasket can be pushed in around the lid section.
Note: This is a push in seal and does not require a sealant.
6.14.8 Testing the gasket with an extension piece of air plumbing, air gauge
and air supply before fitting would be advisable. Pump the gasket up
to 40Kpa and then pinch off the supply. The pressure should not
drop below 30Kpa over a 60 second period.
6.14.9 Refit lid as per instructions in 6.13.6.