


12
Fig. 1
Fig. 2
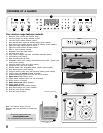
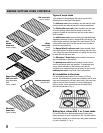
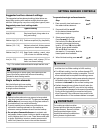
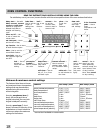
Cooktop display windows
Located on the backguard are digital displays for each of
the heating positions located on the cooktop. Surface
element power levels can easily be controlled and
monitored using these displays in combination with the
corresponding control keypads.
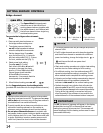
The triple element (some models) feature provides 3
different size settings to choose from a single location on
the cooktop.
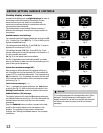
Available power level settings
The cooktop control will display heat levels ranging from Hi
(Fig. 1) to Lo (Fig. 6) and Off (Fig. 7). The Hi setting is the
highest available heat level.
The settings between 9.5 (Fig. 2) and 3.0 (Fig. 3) may be
adjusted in increments of .5 (1/2).
The settings between 2.8 (Figs. 4) and 1.2 (Fig. 5) are
simmer settings which may be adjusted in increments of .2
for more precise heat levels.
Lo (Fig. 6) is the lowest heat level available.
Use the "Suggested power level settings table" provided
later in this section to determine the correct setting for the
type of food you are preparing.
Hot surface window message (HE)
After using any radiant element the cooktop will be very
hot. Even after turning the elements OFF, the cooktop will
remain HOT for some time afterwards. The corresponding
HE (hot element - Fig. 8) message will remain ON and turn
OFF once that element position on the cooktop has cooled
sufficiently (Fig. 7).
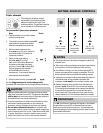
Sabbath feature (Sb) message
The display windows will show the Sb message whenever
the Sabbath feature is active (Fig. 10). When activated, the
Sabbath feature works for both the oven and cooktop
opertations
Once the Sabbath feature is active, changes to the heat
levels for the cooktop elements will not appear in the
displays. The cooktop will react slower to heat level
changes. See "Setting the Sabbath feature" for complete
instructions.
Fig. 6
Fig. 7
Fig. 8
Fig. 9
Fig. 10
Lock window message ( - - )
The (- -) message will appear whenever the lock feature
is active (See Fig. 9). Refer to the lock instructions in the
Setting Oven Controls section for detailed instructions.
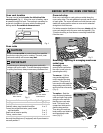
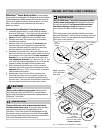
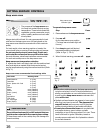
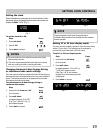
BEFORE SETTING SURFACE CONTROLS
(For models equipped with a bridge feature only) When
setting all 3 bridge elements to heat together, both
display windows for the left front and left rear elements
will display the same set power level & hot element
messages.
NOTE
Fig. 3
Fig. 4
Fig. 5