5
Tools required for installationTools required for installation
Tools required for installationTools required for installation
Tools required for installation
Screw driver (pozidrive n°2 , torx 10 and 20)
Allen spanner 4mm
Shifting spanner 10mm
pipe wrench
3
/
8
Electric drill with twist bit Ø 10 mm
InstallationInstallation
InstallationInstallation
Installation
Pre-Installations CalculationsPre-Installations Calculations
Pre-Installations CalculationsPre-Installations Calculations
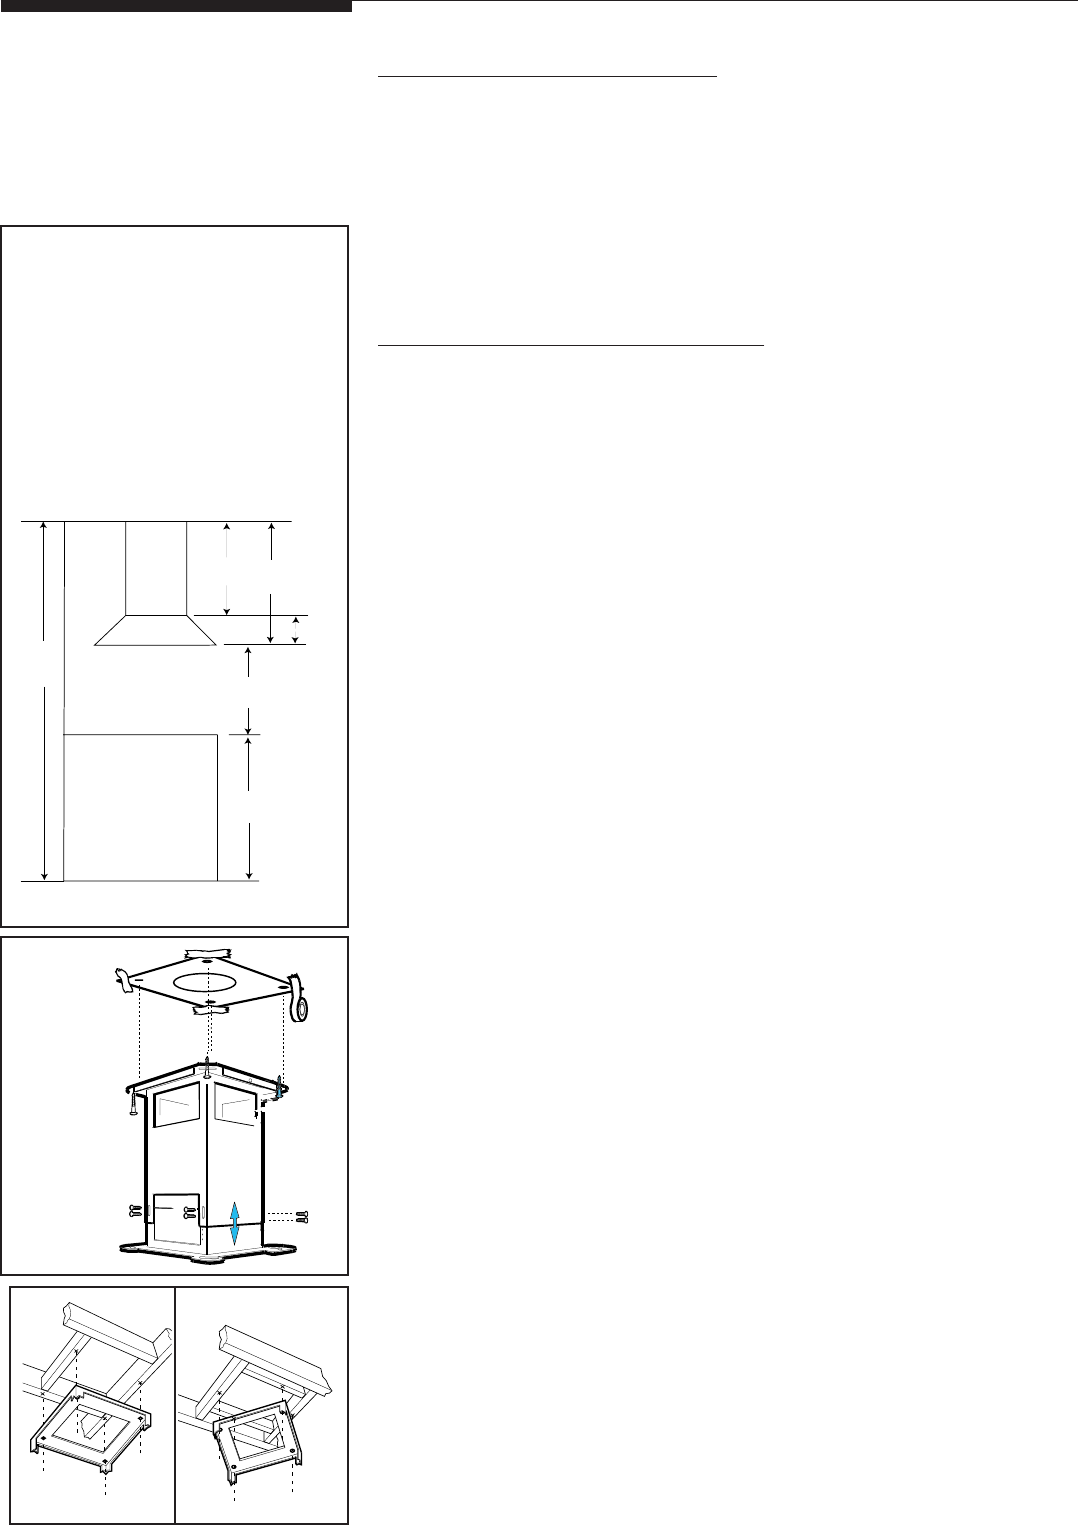
Pre-Installations Calculations
(see Figure 2) (see Figure 2)
(see Figure 2) (see Figure 2)
(see Figure 2)
1.1.
1.1.
1. a) Select a hood preference height P (see Figure 2) that is comfortable for
the user. (30” - 36” recommended, 24” - 36” allowed).
b) Calculate Hood height your installation H (see Figure 2). H = K-C-P.
c) Confirm that H is within the range of min to max H found for your hood.
If not adjust your installation.
d) Calculate Chimney structure height S (use formulas in Figure 2, and
check dimensions of your hood). Save this calculation for use later in the
installation.
Preparation of Mounting SurfacePreparation of Mounting Surface
Preparation of Mounting SurfacePreparation of Mounting Surface
Preparation of Mounting Surface
- Installing supports above - Installing supports above
- Installing supports above - Installing supports above
- Installing supports above
ceiling drywall.ceiling drywall.
ceiling drywall.ceiling drywall.
ceiling drywall.
Note: Take into consideration the hood depth; your hood could be much
deeper than the cooktop.
2.2.
2.2.
2. Mark center lines of cooktop or range on ceiling above. Use centerlines
marked on ceiling to position the mounting template. Note location of
hood front, side, and mounting holes indicated on template.
3.3.
3.3.
3. Remove and save template. Cut and remove ceiling drywall. Install
suitable length 2" x 4" lumber between joists to provide chimney mounting
points as shown in Fig. C and D. Use template for dimensions and required
clearance.
Make sure to affix the added lumber firmly and level. Consult a profes-
sional if you have difficulties or your installation is unique. Consult
template and Figures 3. 4. 5.
Note the weight of the applianceNote the weight of the appliance
Note the weight of the applianceNote the weight of the appliance
Note the weight of the appliance. (see Table1).
4.4.
4.4.
4. Install exhaust duct (see Table 1 for size). Female end shall be 4-1/2" below
finished ceiling and securely fastened to joists. Do not use duct smaller
than the transition.
5.5.
5.5.
5. Install 1/2" electrical conduit in location marked on template and extend
length
SS
SS
S from ceiling.
6.6.
6.6.
6. Install drywall around duct and conduit; then refinish ceiling.
A
C (36"std.)
S
H
K
P
K = Kitchen Height
C = Counter Height (36" standard)
P = Prefered Height of Hood
Bottom above counter
(recommended 30”-36”)
A = Canopy Height
H = Hood height your installation
H = K – C – P
S=
Chimney Structure Height,
your installation.
S = H – A
Figure 2Figure 2
Figure 2Figure 2
Figure 2
Figure 3Figure 3
Figure 3Figure 3
Figure 3
Figure 4Figure 4
Figure 4Figure 4
Figure 4
Figure 5Figure 5
Figure 5Figure 5
Figure 5


