


11
6. TROUBLESHOOTING
The problems given are those most commonly encountered. The corrective actions and troubleshooting
procedures are the initial steps to be taken by restaurant personnel. Any further troubleshooting
procedures should be carried out only be a Factory Authorized Service Center or a local service company
specializing in hotel and restaurant cooking appliances.
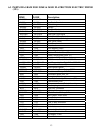
PROBLEM CORRECTIVE ACTION
Fryer will not come on.
No evidence of heating,
even when unit is cold.
1. With switch on, push high-limit thermostat manual reset. (Red
button inside the front door).
2. Check that fryer power cord is fully plugged into wall receptacle.
3. Check main circuit breaker box for tripped breakers.
Fryer slow to heat; poor
recovery.
1. Check temperature sensor location. Temp sensor should be
properly secured under the clamp.
Fryer too hot; oil
scorching; overshooting
set temperature.
1. Check temperature sensor location. Temp sensor should be
properly secured under the clamp.
2. If temperature rises to the hi-limit thermostat shut-off level
consistently, have technician check for sticking or shorted heat
contactor.
3. If oil appears to be scorching with normal temperatures, oil may
have been used too long or be of inferior quality. Replace if
necessary.
6.1 TEMPERATURE CHECK
a. Insert a good grade thermometer or pyrometer probe approximately 8-10cm (3-4 inches) into the
cooking oil/shortening near the fryer temperature sensing probe.
b. Turn temperature control knob to the desired frying temperature.
c. Turn the fryer ON/OFF switch to the ON position and heat the shortening to the desired
temperature setting. Stir if necessary to get all cooking oil/shortening in frypot melted and at the
same temperature.
d. Allow the heating elements to cycle ON and OFF three times after reaching the desired
temperature setting. When the elements come on the fourth time, the pyrometer reading should
be within 2ºC (5ºF) of the temperature control knob setting.