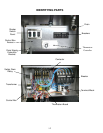
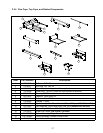
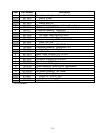
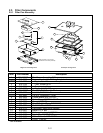
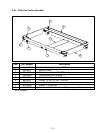
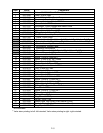
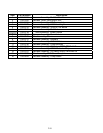
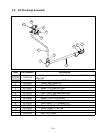
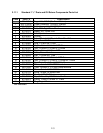
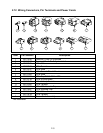
1-5
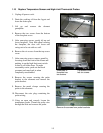
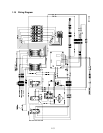
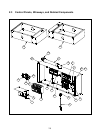
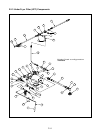
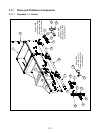
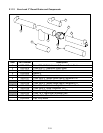
1.10 Replace Temperature Sensor and High-Limit Thermostat Probes
1. Unplug all power cords.
2. Drain the cooking oil from the frypot and
leave the drain open.
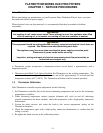
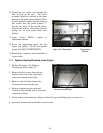
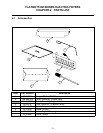
3. Lift up and remove the element
guardplate.
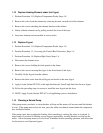
4. Remove the two screws from the bottom
of the faceplate cover.
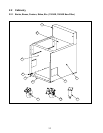
5. After removing screws, gently tilt up and
lower faceplate. Note that when lowering
the faceplate, the door will lower and
swing out to be set aside as well.
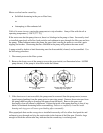
6. Remove the six screws from the top access
cover.
7. After removing screws, remove panel by
lowering down the front of the frame and
pushing in on the high-limit reset switch
so that it will slide down. To make
reassembly easier, push out the black
grommet and snap back in when
completely reassembled.
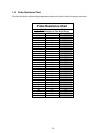
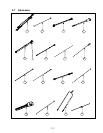
8. Remove the screws securing the probe
bracket to the elements and remove the
probe bracket.
9. Remove the metal clamps securing the
probe to the elements.
10. Disconnect the wire plug containing the
probe wiring.
11. Using an open end wrench, loosen the
temperature probe. Thread the probe wire
through the hole and remove the probe.
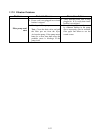
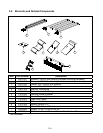
Element Guardplate
Underside of
faceplate has
two screws.
Top access cover
has six screws.
Remove the screws from probe brackets.