4-3
4.3 ELECTRONIC SPARK IGNITION
WARNING
NEVER USE A MATCH OR TAPER TO LIGHT THIS IGNITION SYSTEM!
1. Turn off the electric power.
2. Turn the gas valve dial to "OFF", wait 5 minutes, and then turn the dial to "ON".
3. Set the thermostat to the desired temperature. If the frypot is filled with water (Non-KFC
co-branded locations), set thermostat to 200°F (93°C); if filled with oil, set thermostat to 350°F
(177°C).
4. Turn the fryer power switch on.
5. The blower motor should start and the fryer should light a few seconds later. After burner
ignition, the Thermatron controller controls the burner.
6. If the burner fails to light for whatever reason, a safety circuit will “lock out” the system. To clear
the lockout, turn the fryer off and follow steps 2–4 above.
7. If the flue exhaust fan fails, the gas control valve will shut off the gas supply.
4.4 ADJUSTING BURNERS
1. Fill the frypot with hot or cold water (Non-KFC co-branded locations) to the top OIL LEVEL
line scribed in the back of the frypot. Main burner operation and initial controller calibration can
be checked during this step.
NOTE: In KFC co-branded locations, oil must be used in place of water for burner testing.
2. Set the Thermatron dial to 200°F (93°C), just below that of boiling water.
3. Turn the fryer power switch on. The blower will activate and the main burner will ignite.
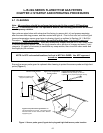
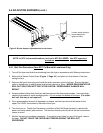
4. Check the main burners and, if necessary, adjust the burner dampers at each burner (Figure 2,
Page 4-4) to obtain the best flame characteristics. An optimum flame should be blue at the
base, 2-½ - 3" in height, and have a reddish-white tip ¾ to 1" in height. To adjust, loosen the
screw of the air shutter, and open or close the shutter until the burner flame matches the
optimum flame description above. Tighten the shutter screw, and repeat for all burners. The
flame should be straight and not pulling to the rear of the fryer. If the flame is pulling to the rear,
inspect the main rear baffle for heat damage and replace if necessary.
5. The burners should shut off just at the water starts to boil.
6. When satisfied that the burners and controller are operating properly, drain the frypot of water
and dry thoroughly.
7. Immediately coat the frypot inside with oil to prevent rusting, or add new oil to the frypot if fryer
is ready for use.


