


1-6
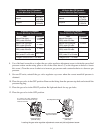
8. Allow the burners to cycle on and off three more times and recheck the thermometer/pyrometer reading
against the thermostat setting. Temperature readings should be within 5°F (2.8°C) of setpoint.
Fryers with thermostat control panels:
NOTE: Remove the thermostat knob from its shaft to allow the control panel to hinge downward.
Follow the instructions in Section 1.4.2 to remove the knob and control panel.
1. Fill the frypot to the lower OIL-LEVEL line with cooking oil. If using solid shortening, pre-melt it
before starting the calibration procedure.
2. Ensure the fryer power switch is in the OFF position, and light the pilot. (Refer to Chapter 3 of the
Installation and Operation manual for detailed lighting instructions.)
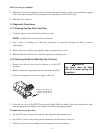
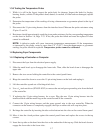
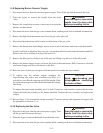
3. Insert a thermometer or pyrometer into the frypot so that it
touches the thermostat guard.
4. Loosen the setscrew and stop screw securing the thermostat
shaft extension to the fl exible shaft. Remove the extension to
expose the slot in the end of the fl exible shaft.
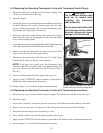
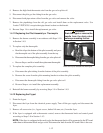
5. Place the fryer power switch in the ON position.
NOTE: If the burner does not light at this time, it does not
mean the thermostat is defective.
Use a small fl at-head screwdriver to slowly turn the fl exible shaft counterclockwise until the burner
lights.
6. When the oil temperature reaches 325°F (162°C), slowly turn the fl exible shaft clockwise until the
burner turns off. Then, allow the fryer to sit for a few minutes.
7. Repeat Steps 5 and 6 at least three times to ensure that the setting is accurate. The thermostat control
is considered properly calibrated if the burner lights when the cooking oil cools to 325°F (162°C).
Do not take the reading when the burner shuts off after raising the temperature.
8. Once the thermostat is calibrated, allow the burner to cycle on and off at least three times to ensure
that it lights at the correct temperature.
9. After the calibration is complete, place the fryer power switch in the OFF position and disconnect
the fryer from the electrical supply.
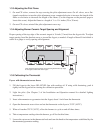
10. Carefully replace the thermostat shaft extension so that the stop screw points straight up. Without
rotating the fl exible shaft, tighten the stop screw, locking nut, and setscrew.
11. Close the fryer control panel and replace the screws and bezel.
12. Reinstall the thermostat knob. Align its pointer with the 325°F (162°C) index mark on the temperature
dial.
13. Reconnect the fryer to the electrical supply.
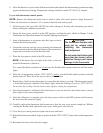
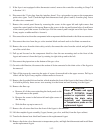
CAUTION
The thermostat fl exible shaft
must not be rotated while
installing the thermostat
shaft extension!
Do not rotate the fl exible shaft
more than two turns in either
direction. Doing so will cause
damage to the thermostat.