


2-3
2.4 Connecting to the Electrical Power Supply
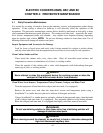
DANGER
This unit must be connected to the voltage and phase specified on the rating and serial
number plate located on the inside of the equipment door. To determine the appropriate
wire size, refer to the POWER REQUIREMENTS chart at the bottom of this page.
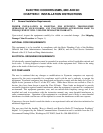
1. If the unit is not equipped with an installed power cord, open the door and remove the contactor
box cover. Position the unit to gain access to the rear and remove the lower back panel.
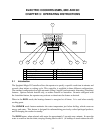
2. Insert an appropriately rated power cord into the rear of the contactor box and make connections
in accordance with the applicable wiring diagram on the following page. Install a strain relief on
the power cord and replace the lower back panel and contactor box cover.
3. Attach a plug that complies with national and/or applicable local codes to the free end of the
electrical power cord and plug the unit into an appropriate outlet.
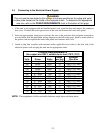
POWER REQUIREMENTS
Use copper wire ONLY, suitable for at least 170ºF (75ºC)
Volts Phase Watts
Amps
(per leg)
Minimum
Wire Size
200 Single 7400 37 AWG 6 (4.1 mm)
208 Single 8000 39 AWG 6 (4.1 mm)
220 Single 7300 34 AWG 6 (4.1 mm)
230 Single 8000 35 AWG 6 (4.1 mm)
240 Single 8000 34 AWG 6 (4.1 mm)
200 3P – Delta 7400 22 AWG 8 (3.3 mm)
208 3P – Delta 8000 23 AWG 8 (3.3 mm)
220 3P – Delta 7300 20 AWG 8 (3.3 mm)
230 3P – Delta 8000 21 AWG 8 (3.3 mm)
240 3P – Delta 8000 20 AWG 8 (3.3 mm)
200 3P – Wye 7400 13 AWG 8 (3.3 mm)
220 3P – Wye 7300 12 AWG 8 (3.3 mm)
230 3P – Wye 7400 11 AWG 8 (3.3 mm)
NOTE: This equipment is field-convertible between single phase and three phase.