


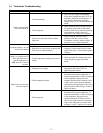


1-2
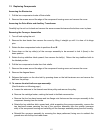
1.3 Replacing Components
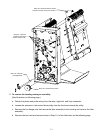
Accessing the Electronics
1. Pull the bun compression knobs off their shafts.
2. Remove the screws around the edge of the component housing cover and remove the cover.
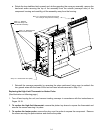
Accessing the Drive Motor and Auxiliary Transformer
Carefully lay the unit on its back and remove the seven screws that secure the bottom cover in place.
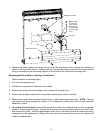
Removing the Conveyor Assemblies
1. Turn off and unplug the unit.
2. Remove the bun feeder then remove the cover by lifting it straight up until it is clear of its hinge
pins.
3. Rotate the bun compression knobs to positions 5 and E.
4. Press down on the top roller(s) of the conveyor assembly to be removed to lock it (them) in the
down position.
5. Rotate the tray stabilizer latch upward, then remove the belt(s). Return the tray stabilizer latch to
the latched position.
6. Pull the bun compression knobs from their shafts.
7. Remove the screws around the edge of the component housing cover and remove the cover.
8. Remove the diagonal brace.
9. Release the tension on the drive belt by pressing down on the belt tensioner arm and remove the
belt from the pulleys.
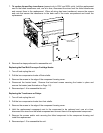
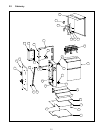
10. To remove the dual-belt conveyor assembly:
(See illustration on following page.)
a. Loosen the setscrew in the forward-most drive pulley and remove the pulley.
b. Remove the cartridge heater, marking the leads to facilitate reconnection.
c. Remove the four hex-head screws and two flange nuts that secure the conveyor assembly to the
component housing from the inside.
d. Rotate the tray stabilizer latch upward and, while supporting the conveyor assembly, remove the
two hex-head screws securing the top of the conveyor assembly from the outside (conveyor
side) of the component housing and carefully pull the conveyor assembly away from the housing.
e. Reinstall the conveyor assembly by reversing the steps performed, being sure to reattach the
ground wire with the top hex head screw.