


J1C, J1X, & J2X MASTER JET SERIES GAS FRYERS
CHAPTER 7: SERVICE PROCEDURES
7-2
CAUTION
When installing thermostats, DO NOT OVER TORQUE.
When electrical wires are disconnected, it is recommended that they be marked to facilitate reassembly.
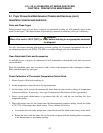
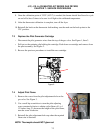
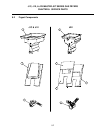
7.1 Replace Controlling or High-limit Thermostat
1. Drain shortening from the frypot.
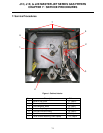
2. Use an allen wrench to loosen set screw at the side of the thermostat knob. Remove the
thermostat knob. See Figure 1, Item 1.
3. Remove the 2 set screws on either side of the thermostat shaft and remove the dial plate.
4. Disconnect the thermostat wires from the gas valve. See Figure 1, Item 2.
5. Use a slotted socket to unscrew the thermostat from the frypot.
6. Apply a small amount of Loctite PST56765 compound to the threads of the new thermostat.
Install the thermostat.
7. To change the high-limit thermostat, disconnect the wires at the gas valve and follow
instructions listed in Steps 5 and 6 to replace thermostat.
8. To calibrate the newly installed thermostat, see Section 5.1.
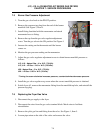
7.2 Calibrating a Thermostat after Installation
1. Fill the frypot to the OIL-LEVEL LINE with shortening.
Pre-melt solid shortening before starting calibration.
2.
Ensure the gas valve knob is in the OFF position.
3.
Insert a mercury thermometer or pyrometer in the center of
the frypot 2 to 3 inches (50 to 75mm) deep.
4. Turn the fryer gas valve to the ON position.
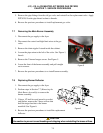
5.
When the shortening temperature reaches 325°F (162°C), turn the thermostat adjusting screw
clockwise until the burner shuts off.
6.
Allow the fryer to sit for a few minutes, and then slowly turn the thermostat adjusting screw
counterclockwise until the burner lights.
7. Repeat Steps 5 and 6 until 325°F (162°C) is reached. A good calibration point is halfway
between the lowest and highest temperature dial readings. This point should be at the 12
o'clock position. The fryer is in calibration if the burner lights at the calibration point as the
shortening temperature drops - not when the burner shuts off as the temperature rises.
NOTE: If the burner does not light
at this time, it does not mean the
thermostat is defective. Recheck
the wiring, and then slowly turn the
thermostat adjusting screw
counterclockwise until the burner
lights.
Turning the adjusting screw
counterclockwise causes the
burner to light, and turning it
clockwise causes the burner to
shut off.