


J1C, J1X, & J2X MASTER JET SERIES GAS FRYERS
CHAPTER 7: SERVICE PROCEDURES
7-4
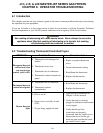
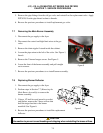
7.5 Burner Gas Pressure Adjustment
1. Turn the gas valve knob to the PILOT position.
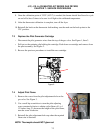
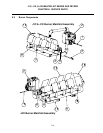
2. Remove the pressure tap plug from the end of the burner
manifold. See Figure 1, Item 4.
3. Install fitting furnished with the manometer and attach
manometer hose to fitting.
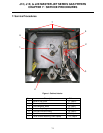
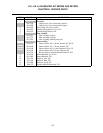
4. Remove the cap from the gas valve regulator adjustment
screw. Turn the gas valve to the ON position. See Figure 4.
5. Increase the setting on the thermostat until the burner
comes on.
6. Monitor the gas pressure reading on the manometer.
7. Adjust the gas valve regulator adjustment screw to obtain burner manifold pressure as
follows:
J1C, J1X – Natural Gas – 4 in. W.C. (7.0 kPa).
J1C, J1X – LP Gas – 10.0 in. W.C. (2.50 kPa).
J2X – Natural Gas – 3 in. W.C. (.75 kPa).
J2X – LP Gas – 8.25 in. W.C. (2.0 kPa).
* Turning the screw clockwise increases pressure, counterclockwise decreases pressure.
8. Install the gas valve regulator cap screw when the correct manifold pressure is obtained.
9. Switch fryer off, remove the manometer fitting from the manifold tap hole, and reinstall the
pressure tap plug.
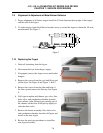
7.6 Replacing the Fryer Gas Valve
1. Disconnect the gas supply to the fryer.
2. Disconnect the wires from the gas valve terminal block. Mark wires to facilitate
reinstallation.
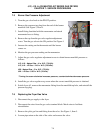
3. Remove the pilot gas line and fitting from the valve. See Figure 1, Item 5.
4. Loosen pipe union on the side of the valve and remove the valve.
Figure 4