


J1C, J1X, & J2X MASTER JET SERIES GAS FRYERS
CHAPTER 7: SERVICE PROCEDURES
7-5
5. Remove the pipe fittings from the old gas valve and reinstall on the replacement valve. Apply
PST56765 Loctite pipe thread sealant to threads.
6. Reverse the previous procedures to install replacement gas valve.
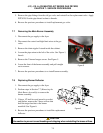
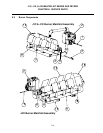
7.7 Removing the Main Burner Assembly
1. Disconnect the gas supply to the fryer.
2. Disconnect the control and high-limit wires at the gas
valve.
3. Remove the drain nipple if stored inside the cabinet.
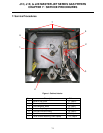
4. Loosen the pipe union to the left of the valve. See Figure 1,
Item 6.
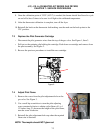
5. Remove the 2 burner hanger screws. See Figure 5.
6. Lower the front of the burner assembly and pull straight
out to remove.
7. Reverse the previous procedures to re-install burner assembly.
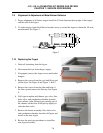
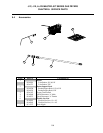
7.8 Replacing Burner Deflector
1. Disconnect the gas supply to the fryer.
2. Perform steps in Section 7.7 (Removing the
Main Burner Assembly) to remove the
burner assembly.
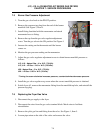
3. Using a 1/2 inch box end wrench or socket
and ratchet, remove the 2 brass orifices that
hold the target bracket to the burner
manifold. See Figure 6.
4. Reverse the previous procedures to install the replacement
deflector.
CAUTION
Use caution to prevent cross threading and stripping when reinstalling the brass orifices.
Figure 5
Figure 6