


KSCF18G COOL ZONE SERIES GAS FRYERS
CHAPTER 3: INSTALLATION INSTRUCTIONS
3-14
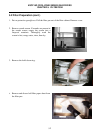
3.10 Initial Cleaning Before Startup
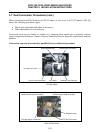
New units are wiped clean with solvents at the factory to remove any visible signs of dirt, oil, and
grease remaining from the manufacturing process. Then, they are coated lightly with oil. Wash
thoroughly with hot, soapy water to remove any film residue and dust or debris before food
preparation. Then, rinse and wipe dry. In addition, wash any accessories shipped with the unit. Close
the drain valve completely and remove the crumb screen. Ensure the screws securing the
temperature probe to the bracket between heating tubes are tight.
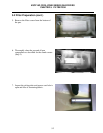
WARNING
All droplets of water must be removed from the frypot before filling with shortening.
Failure to do so will cause hot oil to splatter and injure the operator.
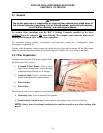
3.12 Final Preparation
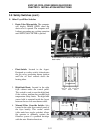
1. The KSCF18G frypot shortening capacity is approximately 40.5 kg (90 lb).
2. Ensure fryer power switches are OFF.
3. Cooking Oil: Fill the fryer to the bottom OIL LEVEL line scribed into the back of the
frypot. Replace the basket support screen.
WARNING
Never operate fryer without enough oil, shortening, or water in the frypot to cover
the heating tubes.
WARNING
NEVER set a complete block of solid shortening on top of heating tubes. To do so
will damage the frypot and increase the potential for flash-point shortening
temperatures and subsequent fire.
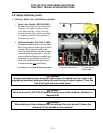
4. Solid Shortening: Either pre-melt solid shortening on another appliance first or cut it into
small pieces and pack it tightly into the cool zone at the bottom of the frypot. Take care not
to disturb the temperature probe or high-limit thermostat. If solid shortening is packed into
the frypot, ensure the float switch is in the "up" position.