


20
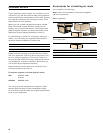
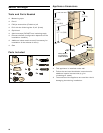
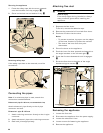
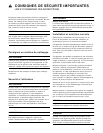
Securing the appliance
1 Press the safety caps with the arrow upwards
onto the brackets until they engage. ®
2 Screw on knurled nut and washer firmly. ¯
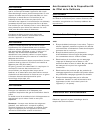
Removing safety caps
If the safety caps have to be removed, use a flat
screwdriver.
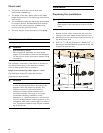
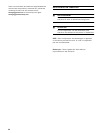
Connecting the pipes
Note: If an aluminum pipe is used, smooth the
connection area beforehand.
Exhaust-air pipe Ø 150 mm (recommended size)
Attach exhaust-air pipe directly to the air-pipe
connector and seal.
Exhaust-air pipe Ø 120 mm
1 Attach reducing connector directly to the air-pipe
connector.
2 Attach exhaust air pipe to the reducing connector.
3 Seal both joints appropriately.
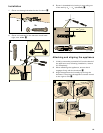
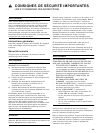
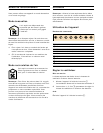
Attaching flue duct
9 WARNING
Risk of injury
From sharp edges during installation. Always
wear protective gloves while installing the
appliance.
1 Separate the flue ducts.
To do this, remove the adhesive tape.
2 Remove the protective foil from both flue ducts.
3 Push one flue duct into the other.
Notes
‒ To prevent scratches, lay paper over the edges
of the lower flue duct to protect the surface.
‒ The slots of the inner flue duct point
downwards.
4 Place flue ducts on the appliance.
5 Push the inner flue duct upwards and attach it to
the angle brackets on the left and right. ¨
6 Press the flue duct downwards until it engages.
©
7 Screw the flue duct to the sides of the angle
bracket using two screws. ª
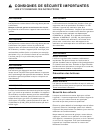
Removing the appliance
1 Loosen the flue duct.
2 Disconnect the appliance from the power supply.
3 Loosen the exhaust air lines.
4 Loosen screws for fastening the appliance.
5 Remove the appliance.
)
*
[
$
%
&