


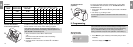
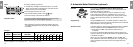

98
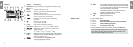
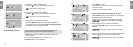
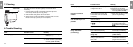
The Water Computer is fitted with a sleeve nut
L
for taps with
G1” (33.3 mm) thread. The adaptor supplied
K
allows the
Water Computer to be connected to taps with a G 3/4” thread
(26.5 mm).
Connect Water Computer to water tap with G1” (33.3 mm)
thread:
1. Screw sleeve nut
L
of the Water Computer on to the tap
thread by hand (do not use pliers).
2. Screw tap connector
M
on to the Water Computer.
Connect Water Computer to tap with G 3/4”(26.5 mm) thread:
1. Screw adaptor
K
on to the tap manually (do not use pliers).
2. Screw sleeve nut
L
of the Water Computer on to the adaptor
thread
K
by hand (do not use pliers).
3. Screw tap connector
M
on to the Water Computer.
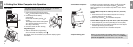
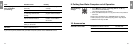
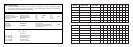
Before you start entering the watering data in the computer
we recommend that you write the data on one of the watering
plans in the appendix to maintain more of an overview.
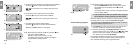
Connect Water Computer:
Compile watering plan:
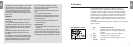
Insert battery:
P
D
I
H
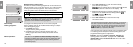
4. Putting Your Water Computer into Operation
This Water Computer must only be powered by a 9V alkaline
manganese (alkaline) battery type IEC 6LR61.
1. Press unlock button
H
and pull control
unit
I
out of the Water Computer housing.
2. Insert battery
J
into battery
compartment.
Ensure that the battery polarity is
correct.
The display shows all the LCD-symbols
for 2 seconds and then moves to the
time / day of week level.
3. Re-insert control unit
I
in housing.
Programming aid:
v Stick the self-adhesive programming
aid on the inside of the display cover .
The display cover can be folded up to protect the display against
the weather.
J
z
P
z
D
L
M
K
GB
GB