


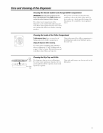
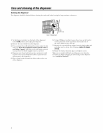
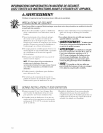
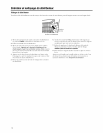

Toremove Toreplace
1°
(_ Supportcollar
Separator 2.
3.
Cleaning the Separator
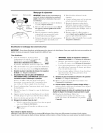
IMPORTANT: Set both power switches 5.
(on the back of the dispenser) in the 0 (off)
position and unplug the water dispenser 6.
before cleaning,
I_eIllOV(' the water t/ottle 21rid drain [lie
dispenser (see Draining the Dispenser). 7.
Remove the Stlllt/ort (ollar by tllrI/illg
counterclockwise and trolling straig-]lt olt_
Remove tile plastic separator t)y
pulling straight out (you may need
t() twist slightly to loosen), 8.
4. Clean the separator with dish soap
and water or ill the top rack of 9.
the dishwasher.
D] T the separator thoroughly on
both sides.
Using a clean cloth or paper towel,
thoroughly dr} tile cold water
r(,servoir,
Place the separator back ill the
dispenser. Make sure tlle long, tapered
end of the separator is positioned
tirnfly on tile metal tllug on the
bottom of tile reservoil:
Replace the supt)ort collar and turn
clockwise mltil it is firmly ill place.
Install a flfll water bottle on the
dispenser see Loading the Dispenser).
Sanitizing and Cleaning the Water Tanks
IMPORTANT." Periodically the water dispenser tanks must be sanitized to prevent unpleasant tastes m the water and cleaned to
remove mineral de )osits that can hnpair flow
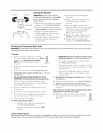
ToSanitize:
gelore cleaning, set both power switches
(on the back of the dispenser) ill tile 0 (off)
position and unplug the water dispenser.
NOTE: For lirst time instal]_tion, skip
steps 2-4.
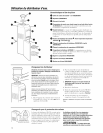
OFF
position
2o Emply the water bottle, then remov( it l}'om tile
dispenser.
3. Drain the water tanks (see Draining the Dispenser).
4. Reinstall the silicon stopper and drain cap (see Draining
the Dispenser).
5. DO NOT ADO BLEACH FIRST OR DIRECTLY TO THE
DISPENSER. Concentrated bleach may damage plastic.
Add 1/2 teasp()()I/ (2.5 ml) elordinary' 6.0%
maximlml h/)_lsehold blea( h to a 2/]lmrt (2 liter)
I/it( her/illed with tap waIer.
6. I)our tile si)lution ii/ the oi)ening at th( top of
the dispenser.
7, Reileat steps 5 and 6 mltil the disilenser is filll.
8, ])ross the hot and cold dispenser butIons imtil
th( water just llegins to flow l]'oln tile taps.
9. Allow to sit/br 15-20 nlinutes.
10. Rinse out the bleach solution:
-- Drain the Wat(T tanks into a larg{' lm(ket
(see Draining the Dispenser).
-- Make sm'e that tile silicon stoI)p('r is NOT
installed.
-- IMPORTANT: Remove the separator and wipe out the
cold water reserve# (see Cleaning the Separator).
-- Clean, then reinstall the separator and (ollar
(s(w Cleaning the Separator).
-- Pore" aill)rilximat{'ly' 1 gallon (4 qllarts or 4 lit{'rs)
of fi'esh tail water into th_ top and allow to drain
inlo tile lmcket.
-- Fh/sh with all additional 1 gallon (4 qmu'ts or
4 lilers) ofli'esh tap water and allow to drain
into th( l/uck_ t.
11. Reinstall No silicon stopper and drain cap (see Draining
the Dispenser).
12, Install a ti'esh wa[er botth' (see Loading the Dispenser).
13. Dispense 1 quart (1 fiter) of water ffmn each tap and
tast( to mak{' sur{' the bh'a( h solmion is (om/)h'tely'
r{'lllOV{'(1,
If you continue to taste the chlorine from the bleach solution,
repeat steps 10-13 until the taste is gone.
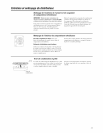
14. Plug ill lhe dispens(r. Then Illrn oil |he ha| [_
and told I)(}_A'(r swiIches (on |he lla(k of Ill(
disI}enser)" ON
position
To Remove Mineral Deposits:
Mix 2 quarts (2 liters) of water with two quarts of vinegar OR mix I gallon of water (4 liters) with 16ounces (454 g) of citric acid
crystals, Bleach does not remove mineral deposits, Do this in place of step 5 when removing mineral deposits,