


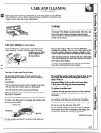


)
2. AkmBinUmr!i
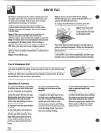
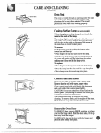
A Connectlengthofcopperbuildingwireto
rangeterminalblock.
B. Splicecopperwiresto ahminumwiringusing
specialconnectorsdesignedand U.L.approved
forjoiningcopperto aluminum,andfollowthe
connectormanufacturer’srecommended
procedureclosely
NOTE:Wireused,locationand enclosureof
splices,etc.,mustconformto goodwiring
practiceandlocalcodes.
!5
Frame groundedto neutralofappliance
through a link.Ifused in a MOBILEHOMEor
ifLOCALCODESdo notpermitgrounding
throughthe neutral:
1)disconnectthe l.inkfromneutral,
2)use groundingterminalor leadto ground
1unitin accordancewith~oc~codes,~d
3) connectneutralterminalor leadto branch
circuitin usualmanner.
(Ifthe applianceis to be connectedby
means ofa cord set, use 4-conductorcord
6
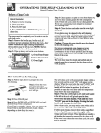
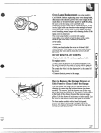
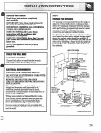
ANANTI-TIPbracketis supp&xlwithinstructions
forinstallationin a varietyoflocations.The
instructionsincludea template,aparts listanda
listoftoolsnecessaryto completethe installation.
Readthe HVHWRTANTSAFHYDHHU.J(310NS
andthe.instructionsthatfityoursituationbefore
beginninginstdkitkm.
1. Rangemustbe securedbyANTI-TIPbracket
supplied.
2. Seeinstructionsto install(suppliedwith
bracket).
3. Unlessproperlyinstalled,rangecouldbe
tippedby steppingor sittingon door.Injury
mightresultffornspilledhot liquidsor from
rangeitself.
TypicalinstallatimofAnti-Tipbracket
Attachmentto Wall
Bracket
ScrewMust Enter
WVaflFYate
W?/mdoriWeta/
1
\
7
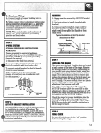
The rangemustbe leveLLevelingfeetare located
at eachcorner ofthe base ofthe range.Remove
the storagedraweror kickpanei(dependingon
yourmodel)andusingchannellocks,rotatethe
levelimfeetin andout asreauiredto levelthe
range.-(or instructionsonhhwto removeand
replacethe storagedraweror the kickpanel,see
the CleaningUnderthe Rangesectionin Care
andCleaning.)On somemodels,there are plastic
coverswhichmaybe removedforeasy
adjustment(justsqueezeandpull).
I
Oneofthe rear levelingfeetwillengagethe
ANTI-TIPbracket (allowfor somesideto side
..
adjustment).Allow=aminimumclearanceofI/$tf
betweenthe range andthe levelingfootthat is to
be instded intotheANTI-TIPbracket.
I
Checkthe rangeforproperinstdation intothe
ANTI-TIPbracket (afterthe ramzehasbeen
properlyinstalled)by grasping&e edgesofthe
REARburner holesandcarefullyattemptingto
tiltthe rangeforward.
8
Besure allswitchesare in the “off”position
beforeleavingthe range.