


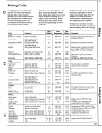

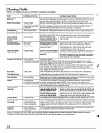

Cleaning Guide
NOTE: Let ra%ge/oven parts cool before touching or handling.
,fi.>
,:;
GENERAL DIRECTIONS
\.&
PART
Bake Unit and
MATERIALS TO USE
Do not clean the bake unit or broil unit. Any soil will bum off when the unit is heated. NOTE:
The bake unit is hinged and can be lifted gently to clean the oven floor. If spillover, residue, or
ash accumulates around the bake unit, Eentlv wi~e around the unit with warm water.
Broil Unit
-.,
Drain fat, cool pan and rack slightly. (Do not let soiled pan and rack stand in oven to cool.)
Sprinkle on detergent. Fill the pan with warm water and spread cloth or paper towel over the
rack. Let pan and rack stand for a few minutes. Wash; scour if necessary. Rinse and dry.
OPTION: The broiler pan and rack may also be cleaned in a dishwasher.
Broiler Pan and Rack
● Soap and Water
● Soap-Filled Scouring Pad
● Commercial Oven Cleaner
● Dishwasher
Control Knobs:
Range Top and Oven
● Mild Soap and Water
Pull off knobs. Wash gently but do not soak. Dry and return controls to range making sure to
match flat area on the knob and shaft.
Wash all glass with cloth dampened in soapy water. Rinse and polish with a dry cloth. If knobs
are removed, do not allow water to run down inside the surface of glass while cleaning.
Outside Glass Finish
● Soap and Water
To safely clean surfaces: wash, rinse, and then polish
with a dry cloth.
hletal, including
Brushed Chrome
Cooktop
● Soap and Water DO NOT USE steel wool,
abrasives, ammonia, acids or
commercial oven cleaners.
Porcelain Enamel
and Painted Surfaces*
● Paper Towel
● Dry Cloth
● Soap and Water
DO NOT USE oven cleaners,
cleansing powders or harsh
abrasives. These might
scratch the surface.
If acids should spill on the range while it is hot, use a dry
paper towel or cloth to wipe up right away. When the
surface has cooled, wash and rinse. For other spills, such
as fat smatterings. etc., wash with soap and water when
cooled and then rinse. Polish with dry cloth.
DO NOT USE oven cleaners,
cleansing powders or harsh
abrasives.
Outside and Inside
of Oven Door*
QSoap and Water To remove oven door for easier cleaning, see instructions in
the cleaning section of this book. Use soap and water to
thoroughly clean both the inside and outside of door. Rinse
well. NOTE: Soap left on door liner causes additional
stains when the oven is reheated.
Standard Oven Interior*
● Soap and Water
● Soap-Filled Scouring Pad
● Commercial Oven Cleaner
Cool before cleaning.
FOR LIGHT SOIL:-Frequent wiping with mild soap and water (especially after cooking
meat) will prolong the time between major cleaning. Rinse thoroughly. NOTE: Soap left on
liner causes additional stains when oven is reheated.
FOR HEAVY SOIL: Choose a non-abrasive cleaner and follow label instructions, using thin “~“-~
layer of cleaner. Use of rubber gloves is recommended. Wipe or rub lightly on stubborn
3
spots. Rinse well. Wipe off any oven cleaner that gets on thermostat bulb. When rinsing oven
after cleaning, also wipe thermostat bulb.
Only a damp cloth maybe used to clean aluminum foil oven bottom liner. Aluminum foil
oven bottom liner may be replaced with heavy weight aluminum foil cut to the size of the
ot%zinalliner. Be sure to remove this liner from oven bottom before cleanin~ oven.
Removable
Aluminum Foil
Oven Bottom Liner
● Damp Cloth
● Soap and Water
Remove the Oven Vent Duct found under the right rear surface unit. Wmh in hot, soapy water
and dry and replace. (Opening should match opening in drip pan.)
Your shelves can be cleaned by using any and all mentioned materials. Rinse thoroughly
to remove all materials after cleaning. NOTE: Some commercial oven cleaners cause
darkening and discoloration. When using for first time, test cleaner on small part of shelf and
check for discoloration before completely cleaning.
Oven Vent Duct
Shelves
● Soap and Water
● Soap-Filled Scouring Pad
● Commercial Oven Cleaner
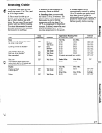
DO NOT USE dishwasher to Spatters and spills bum away when the coils are heated. At
clean the surface unit coils.
the end of a meal, remove all utensils from the Calrod’ unit
DO NOT handle the unit and heat the soiled units at HI. Let the soil bum off about a
before completely cooled. minute and switch the units to OFF. Avoid getting cleaning
DO NOT immerse plug-in
materials on the coils. Wipe off any cleaning materials with
units in any kind of liquid.
a damp paper towel before heating the Calrod&unit.
For cleaning, remove drawer by pulling it all the way open, tilt up the front and lift out. Wipe
with damp cloth or sponge and replace. Never use harsh abrasives or scouring pads.
Clean as described below or in the dishwasher. Wipe all rings after each cooking so unnoticed
spatter will nti “burn on” next time you cook. To remove
“burned-on” spatters use any or all
cleaning materials mentioned. Rub lightly with scouring pad to prevent scratching of the
surface.
CaIrod’ Surface
Unit Coils
Storage Drawer
● Soap and Water
● Soap and Water
● Stiff-Bristled Brush
● Plastic Scouring Pad
Chrome-Plated
Trim Rings
Aluminum
Drip Pans
● Soap and Water
● Plastic Scouring Pad
● Dishwasher
Cool pan slightly. Sprinkle on detergent and wash or scour pan with warm water. Rinse and
dry. In addition, pan may also be cleaned in the dishwasher.
*SpillaEe of marinades, fruit juices, tomato sauces and basting materials containing acids may cause discoloration. Spillovers should be wiped up
irnme~lately, with care being taken not to touch any hot portion of the oven. When the surface is cool, clean and rinse.
22
,