


❑
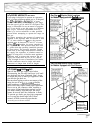
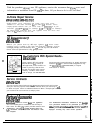
CONVERT THE
OVEN BURNER ORIFICES
Oven
Burner
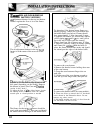
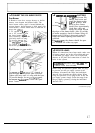
1. Remove oven door, storage drawer or broiler
drawer, oven bottom and burner baffle. The
lower burner orifice spud is located behind the
storage drawer, broiler drawer or kick panel. (On
some models, a metal shield must be removed to
access the
ortilce.)
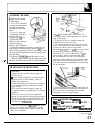
2. To convert to
U
gas,
use a 1/2” wrench to turn
the lower burner
orflce
spud clockwise. Tighten the
spud only until it is snug.
To prevent damage, do
not
overtighten the spud.
To convert to
natiral
gas,
loosen the spud about 2 turns.
Broil Burner
(on
some models)
To convert to LP gas, use a 1/2” wrench to
turn the upper burner orifice spud clockwise.
Tighten spud only until it is snug with the base.
To prevent damage, do not
overtighten
spud.
To convert to
natiral
gas, loosen the spud
about 2 turns.
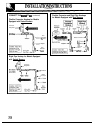
❑
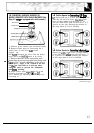
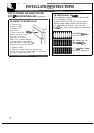
COHVERTAIRADJUSTMENT
SHUTTER(S)
For LP gas, loosen the
Phillips head screw and
rotate the shutter to the
Screw
till
open position. With
Air Shutter
baffle in place, flames
should have approximately
l-inch blue cones and
should not extend beyond
the edges of the burner baffle. After 30 seconds
of burner operation, check for flames lifting off
burner ports. If lifting is observed, gradually
reduce air shutter opening until flames are
stabilized.
For
natird
gas, the shutter should be open
1/2” or about 3/4 of the way open.
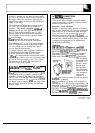
❑
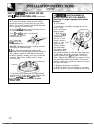
CHECK
FOR LEAKS
When all connections have been made, make sure
all range controls are in the off position and turn
on the main gas supply valve. Use a liquid leak
detector at all joints and connections to check for
leaks in the system.
CA~ON:
DO NOT USE A
FME
TO
CHECK FOR GAS LEAKS.
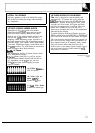
When using test pressures greater than 1/2 psig
to pressure test the gas supply system of the
residence, disconnect the range and individual
shut-off valve from the gas supply piping. When
using test pressures of 1/2 psig or less to test the
gas supply system, simply isolate the range from
the gas supply system by closing the individual
shut-off valve.
(continued next page)
47