


12
Installation Instructions
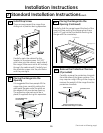
Lift the oven door by
placing one hand on
each side. The door is
heavy, so you may need
help. Do not lift the door
by the handle.
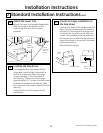
With the door at the same angle as
the removal position (halfway between
the closed and broil stop position,
seat the notch of the hinge arm into
the bottom edge of the hinge slot.
The notch of the hinge arm must be
fully seated into the bottom of the slot.
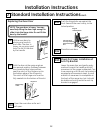
Pushthehingelocksupagainstthe
front frame of the oven cavity, to the
lockedposition.
Close the oven door.
StandardInstallationInstructions cont.
D
NOTE:
Theovendoorisheavy.Youmay
need help lifting the door high enough to
slideitintothehingeslots.Donotliftthe
doorbythehandle.
D8
D9
BottomEdge
ofSlot
HingeArm
HingeNotch
NotchofHinge
SecurelyFittedinto
BottomofHinge
Slot
Hingein
LockedPosition
ReplacingtheOvenDoor
Open the oven door as far as it
will open.
D11
D12
CheckforProperInstallationof
Anti-TipBracket
Lower the oven door and gently apply
medium force at the handle end until
movement of the range is detected. Con-
tinuepressinguntiltheanti-tipbracketis
engagedandmovementstops.Asmall
amount of movement is acceptable at
thebackoftherangetop,butitshould
be stable and not tip once the anti-tip
bracketisengaged.
D13
D10