


6
Model GGH2O
®
Unpacking
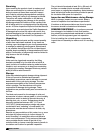
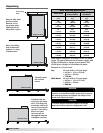
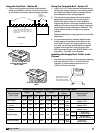
Hood Width and Base Weights
Hood Width
Base Weight
without Water
Base Weight
with Water
inches
(cm)
lbs.
(kg)
lbs.
(kg)
48
(121.92)
440
(199.58)
488
(221.35)
51
(129.54)
449
(203.66)
497
(225.44)
54
(137.16)
457
(207.29)
505
(229.06)
57
(144.78)
465
(210.92)
513
(232.69)
60
(152.40)
474
(215.00)
522
(236.78)
63
(160.02)
483
(219.09)
531
(240.86)
66
(167.64)
491
(222.71)
539
(244.49)
69
(175.26)
499
(226.34)
547
(248.12)
72
(182.88)
508
(230.43)
556
(252.20)
DANGER
The maximum weight (weight with water) should be
used for the maximum weight of the hood to ensure
the ceiling structure can support the weight of the
hood when filled with water.
CAUTION
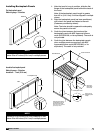
To ensure proper structural support, all hanger
brackets must be used for hanging the hood.
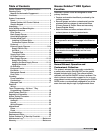
1
2
3
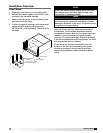
Front Lifting
Skid
Profile of Hood
Profile of Hood
Profile of Hood
Profile of Hood
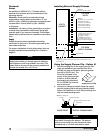
Remove side, back and top lumber.
Remove 3-inch lag screws.
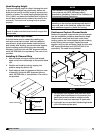
Holding the front lifting skid in
place and position the skid in
front of bottom skid.
Carefully rotate hood
as shown.
Carefully slide the hood
onto the lifting skid.
The lifting skid should be used to
life the hood into it’s final position.
If the lifting skid is not used, the
hood will be damaged during the
installation process.
1
2
3
Front Lifting
Skid
Profile of Hood
Profile of Hood
Profile of Hood
Profile of Hood
Remove side, back and top lumber.
Remove 3-inch lag screws.
Holding the front lifting skid in
place and position the skid in
front of bottom skid.
Carefully rotate hood
as shown.
Carefully slide the hood
onto the lifting skid.
The lifting skid should be used to
life the hood into it’s final position.
If the lifting skid is not used, the
hood will be damaged during the
installation process.
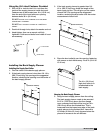
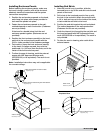
Remove side, back
and top lumber.
Remove 3-inch
lag screws while
holding the front
lifting skid in place.
Base weight is based on 48 inches (121.92 cm) hood
length. For each additional foot of hood in length, add
55 lb/ft (24.95 kg/m) in weight of hood and 67lb/ft
(30.39 kg/m) in weight of hood filled with water.
Example of a 10 foot hood:
Dry: 48 inch width x 120 inch length
= 440 lbs. + (6 ft. x 55 lb/ft)
= 440 lbs. + 330 lbs.
= 770 lbs.
With Water: 48 inch width x 120 inch length
= 488 lbs. + (6 ft. x 67 lb/ft)
= 488 lbs. + 402 lbs.
= 890 lbs.
1
2
3
Front Lifting
Skid
Profile of Hood
Profile of Hood
Profile of Hood
Profile of Hood
Remove side, back and top lumber.
Remove 3-inch lag screws.
Holding the front lifting skid in
place and position the skid in
front of bottom skid.
Carefully rotate hood
as shown.
Carefully slide the hood
onto the lifting skid.
The lifting skid should be used to
life the hood into it’s final position.
If the lifting skid is not used, the
hood will be damaged during the
installation process.
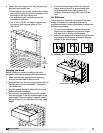
When front lifting
skid is detached,
position it in front
of bottom skid.
Carefully slide the
hood onto the lifting
skid. The lifting skid
should be used to lift
the hood into its final
position. If the lifting
skid is not used,
the hood will be
damaged during the
installation process.
Carefully rotate
the hood as
shown.