


Crathco
®
5000 Series Manual Page 13
Daily Cleaning Procedure (cont.)
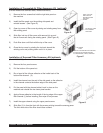
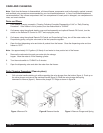
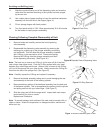
Note: The best way to remove an “O” Ring is to first wipe off all of the lubricant
using a clean paper towel. Pinch the “O” Ring upward with a dry towel between
your index finger and thumb. When a loop is formed in the “O” Ring, roll it out
of the groove with your other thumb. Always remove the “O” Ring farthest from
the end of the plunger first. (See figure M).
2. Take all components to the cleaning area.
3. Carefully inspect the “O” Rings and replace if necessary.
Cleaning Carburetor, Dispensing Valve and Plunger Assembly
1. Prepare 1 gallon solution of hot tap water and a good grade of
dish washing detergent.
2. Thoroughly wash valve plunger, spring, carburetor assembly and all
“O” Rings in detergent solution.
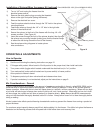
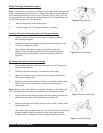
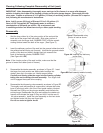
3. Using medium sized brush (supplied with freezer) clean the
bottom of the valve body and the inside of the plunger bore with
detergent solution taking care to remove all remaining lubricant
(figure N).
Sanitizing Carburetor and Valve Components
1. Re-assemble carburetor assembly installing the two “O” Rings at the
bottom of the carb tube.
2. Place the carburetor assembly in the bottom of the hopper.
3. Replace “O” Rings on valve plunger and lay plunger assembly on a
clean piece of paper towel.
4. Prepare a minimum of 4 gallons (15 liters) of sanitizing solution (Stera
Sheen Green Label or equivalent) following the manufacturer’s
instructions.
Note: Add 4 ounces of Stera Sheen to 4 gallons (15 liters) of 120° Fahrenheit
(50° Centigrade) water to achieve a concentration of 100 parts per million.
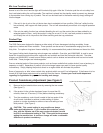
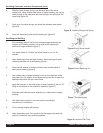
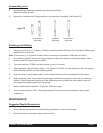
5. Dip the medium sized brush (supplied) into the sanitizing solution and
sanitize the inside bore of the dispensing valve (figure O).
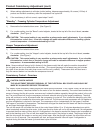
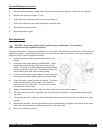
6. Place a small amount of sanitary lubricant onto a piece of clean paper
toweling (figure P).
7. Use a clean piece of paper toweling to pick up the small end of the valve
plunger assembly. Apply the lubricant on the other piece of paper
toweling to the “O” Rings on the valve plunger assembly (figure P).
Figure M Ring Removal
Figure N Clean Valve Body
Figure O Sanitize Valve Body
Figure P Lubricate Plunger