


Page 6 Shuttle Brewers & Airpot/Shuttle Brewers
ƽ
Operation
CAUTION
HOT LIQUID HAZARD!
Water used for brewing coffee is very hot. Use caution when brewing, pouring, or transporting
coffee. Accidental spills may result in severe burns.
1) Place an empty, warm Shuttle on the shelf, under the brew head. Turn on the warmer if available.
2) If the Shuttle is not warm, allow the warmer to heat the Shuttle. Only a short brew of water will speed this.
A cold Shuttle will significantly lower the temperature of the brewed coffee.
3) Remove the filter basket and line with a filter paper. Paper size is 13 x 5 for the smaller basket, BB1.5, and
14 x 6 for the larger, BB2.0.
4) Place ground coffee in the filter basket. Follow corporate recommendations for amount of coffee and grind.
A full Shuttle is 1.5 gallons (5.7L). A full vacuum Shuttle is 1.6 (6.0L) gallons.
5) Slide the basket into the brewer making sure the spout lines up with the top of the Shuttle.
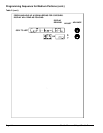
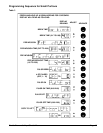
6) If ready lights are lit, press correct batch size button.
7) Brew spray time is about 4 minutes for a full Shuttle. After the brew, allow the coffee to drip for 1 to 2 minutes.
Ready light will flash during the entire brew spray and drip cycle. Brew basket will be locked in place until drip
cycle is finished.
CAUTION
Coffee basket contains very hot water until the drip is completed. Early removal of a dripping
basket could result in burns.
8) Dump the grounds from the basket and rinse for the next brew. Coffee is ready to serve.
9) The Shuttle may be placed on remote warming stations. Use caution when moving a full Shuttle.
ƽ
Installation (cont.)
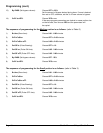
Start-up
1) Flip power supply to machine “ON” at the branch supply disconnect and allow the water tank to fill. The machine
will make a subtle hissing sound while filling.
2) Once the brewer is full, it will take 15 to 35 minutes to heat. The ready lights will turn on when up to temperature.
3) Insert the brew baskets and place a Shuttle or airpot under the baskets. Brew at least one batch from each side.
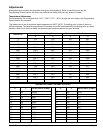
Check the level in the container to be sure the brew volume is correct. Remember that when using coffee, the
level will be lower. Do this for all batch sizes. The water must be hot to check the levels. If adjustments are needed,
see the adjustments section of this manual.
Attention: A watchdog circuit monitors the fill valve “ON” time. If the “ON” time exceeds 6 minutes
continuously, the brewer will display message “ER1” and cease operation. Normal initial fill time on
some models exceeds 6 minutes. Turn off power to brewer and turn back on; this will reset the
controller and allow brewer to complete filling.