


CARE AND CLEANING
Cleaning and sanitizing frequency must be followed according to state and local health department regulations.
NOTE: Each time the freezer is fully disassembled, all foodzone freezer components must be thoroughly washed
and sanitized using procedures recommended by the local health department. In lieu of local health department
recommendations, use a three compartment sink; one compartment to wash parts in detergent, one compartment to
rinse, and one to sanitize.
Drain and Rinse
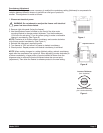
1. If the freezer is empty, proceed to Disassembly and Cleaning. If there is product in the freezer, turn either the right
or left front panel switch to “CLEAN”. Most users schedule cleaning when product in the hopper is low to minimize
product loss.
2. On freezers using the optional Remote Fill Control and Proportioning Pump, turn “OFF” the water valve on the
Proportioning Pump, using the valve next to the inlet pressure regulator and turn the switch on the Remote Fill
Control to “OFF”.
3. Open the front dispensing valve and drain all product from the freezer. Close the dispensing valve and turn
freezer to “OFF”.
NOTE: Use approximately 2½ gallons (10 liters) of cool water to rinse product out of freezer.
4. Remove the carburetor tube and pour water into the storage hopper. Allow the water to fill the freezing cylinder.
5. Turn the panel switch to “CLEAN” for 5 minutes.
6. Open the dispensing valve and drain the water from the freezer.
7. Turn the freezer “OFF”.
Disassembly and Cleaning
Note: For cleaning and sanitizing before initial start-up remove carb tubes, dispense plungers, handles and springs
from parts bag first.
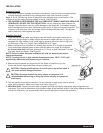
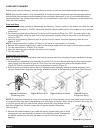
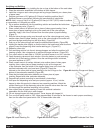
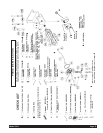
1. Disassemble the dispensing valve assembly (Figure M). Pull out valve handle retaining pin while supporting the
valve plunger from the bottom (Figure N). Push up on the valve plunger and remove the stainless handle
(Figure O). Slide the valve plunger and spring downward to remove (Figure P).
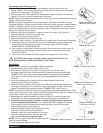
2. Remove knobs and carefully remove the front dispensing valve assembly, leaving the dasher assembly in the
cylinder. Remove the o-rings from the plunger assembly and back of the dispensing valve body. (See Figure Q)
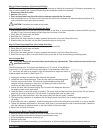
NOTE: The best way to remove an o-ring is to first wipe off all of the lubricant using a clean paper towel. Pinch the
o-ring upward with a dry paper towel between your index finger and thumb. When a loop is formed in the o-ring, roll
it out of the groove with your other thumb. Always remove the o-ring farthest from the
end of the plunger first. Carefully inspect the o-rings and replace if necessary.
(See Figure Q)
3. Remove the dasher assembly from inside the freezing cylinder taking care to avoid
damaging the rear seal assembly at the back of the freezing cylinder. Disassemble
the dasher assembly by removing the stator rod and front and rear stator rod
bearings.
Figure N Remove Pin
Figure M Disassemble
Dispensing Valve
Figure O Remove Handle
Figure P Remove
Plunger and Spring
Figure Q Ring Removal
Page 8 Model 3312