


How to Clean Condenser (Air-Cooled Unit Only)
NOTE: Loss of refrigeration efficiency will result if condenser is allowed to become dirty. Excessive compressor run
time or loss of capacity are a good indication that the condenser needs to be cleaned.
1. Disconnect electrical power.
2. Remove side panels.
3. Place a damp towel over the side of the condenser opposite the fan motor.
4. Use compressed air or CO2 blow out dirt from the fan side of the condenser. An alternate cleaning method is to
use a condenser brush and vacuum cleaner.
CAUTION: Procedure can create a loud noise.
How to Clean Exposed Filter (Air-Cooled Unit Only)
1. Slide exposed filter out of the rails by pulling forward on the filter. It is recommended to remove the filter by using
the palm of your hand and applying even pressure to the face of the filter.
2. Clean filter with liquid soap and water.
3. Soak filter for 15 minutes.
4. Rinse filter with heavy stream of water, opposite the direction of air flow. Allow filter to dry.
5. Slide the filter into the rails until the filter contacts the stop on the top rail.
How to Clean Concealed Filter (Air-Cooled Unit Only)
1. For concealed filters lift lid and pull up on filter tab to remove filter.
2. Clean filter with liquid soap and water.
3. Soak filter for 15 minutes.
4. Rinse filter with heavy stream of water, opposite the direction of air flow. Allow filter to dry.
5. Slide filter into top of filter cover with removal clip up and the air flow arrows facing the existing panel.
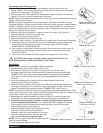
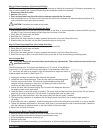
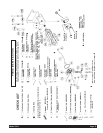
How to
Adjust Belt
CAUTION: Unplug the machine before performing any adjustments. This procedure must be done by a
qualified technician.
Check the belt tension. The proper belt deflection is 1/2” over all. If the deflection
is more than 1/2” the motor will need to be lowered. If the deflection is less than
1/2”, the motor will need to be raised. Follow this procedure to adjust the motor to
achieve proper belt tension. (See Figure FF)
1. Unplug the machine and remove both side and rear panels.
2. Locate the motor flange bearings. These are the side mounted bearings that
hold the motor to the cradle. The motor is double shafted and the shaft
extends through a bearing on each end. The bearing is held to the motor
cradle by two allen bolts on each bearing.
3. Loosen the allen bolts on each bearing. Do not loosen the setscrews that hold
the bearing collar to the motor shaft.
4. Lower the motor or raise the motor as needed. The motor must be kept level from front to back. Do not lower or
raise only one end of the motor. This will result in excessive belt wear and belt noise.
5. Tighten all four allen bolts down. Align the motor pulley with the top pulley if needed.
6. The motor pulley should be in alignment with the large (driven) top pulley. Use a straight edge along the
top pulley.
7. If the pulleys are not in alignment, loosen the setscrew on the motor pulley and move either in or out as needed.
8. Tighten the setscrew back down on the motor shaft (use of non-permanent loc-tite is recommended). Please be
sure the setscrew is tightened down on the flat surface of the motor shaft.
9. Return the unit back to service.
How to Change Back Lit Sign Merchandiser Bulb
1. Remove the two screws, located on the top of either side of the sign.
2. Lower the metal enclosure that frames the merchandiser insert.
3. Pull merchandiser enclosure down and out.
4. Replace bulb inside.
5. Reassemble. For ease of assembly, put merchandiser in light box before placing metal enclosure back on.
!
!
Figure FF
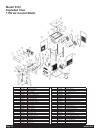
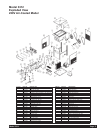
Model 3312 Page 13