


Page 9
SKU 94559 For technical questions, please call 1-800-444-3353
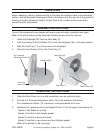
4. Slide the Food Tray (71) back, exposing the cutting Blade (47).
5. Lift off the Food Pusher (67) off the Food Tray, and place the meat to be cut on the
Food Tray. Push it all the way against the Main Body (9) wall.
6. Place the Food Pusher against the right side of the meat to be cut.
Warning: Avoid serious injuries. Never hold the meat to be cut with your hands. Keep
fingers away from the cutting Blade. Always use the Food Pusher (67).
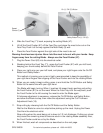
7. Plug the Power Cord (63) into the electrical outlet.
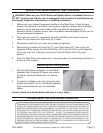
8. Standing behind the Food Tray (71), grasp the Food Pusher (67) with your left hand,
keeping your thumb safely behind the Food Pusher.
9. Place your right arm over your left hand, and place your right fingers onto the On/Off
Button and Safety Button.
This method of crossing your arms is highly recommended to keep the possibility of
your right-hand fingers from slipping off the Food Pusher and into the rotating Blade.
10. When you are ready to begin cutting, press in and hold the On/Off Button and Safety
Button at the same time with your right hand.
The Blade with begin turning. When it reaches full speed, begin pushing and pulling
the Food Pusher (67) to cut the meat. When the Food Tray is all the way back, push
the Food Pusher to the left causing the meat to enter the Blade again.
If thickness adjustment is necessary, release the On/Off Button and Safety Button,
and allow the Blade to stop, then make the adjustment using the Cut Thickness
Adjustment Knob (18).
11. Stop cutting by releasing both the On/Off Button and the Safety Button.
Wait for the Blade to come to a stop before picking up the meat. Unplug the Power
Cord from the electrical outlet.
Stop cutting when the meat being cut is down to 1/2 inch thickness. Cutting any closer
may cause the remaining meat to become stuck in the rotating Blade assembly. Also,
the Food Pusher could be cut by the Blade.
12. When finished, wash all components as described on the next page.
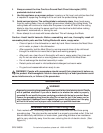
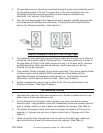
Speed
Control (7)
On (I) / Off (O) Button
Safety Button On (I) / Off (O)