


5
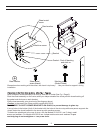
Installation Clearances
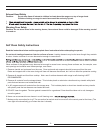
If the range must stand beside a refrigerator, it is important for proper air circulation that there be at least 5" of space between
the two appliances.
Do not install range closer than 1/2" from adjacent surfaces.
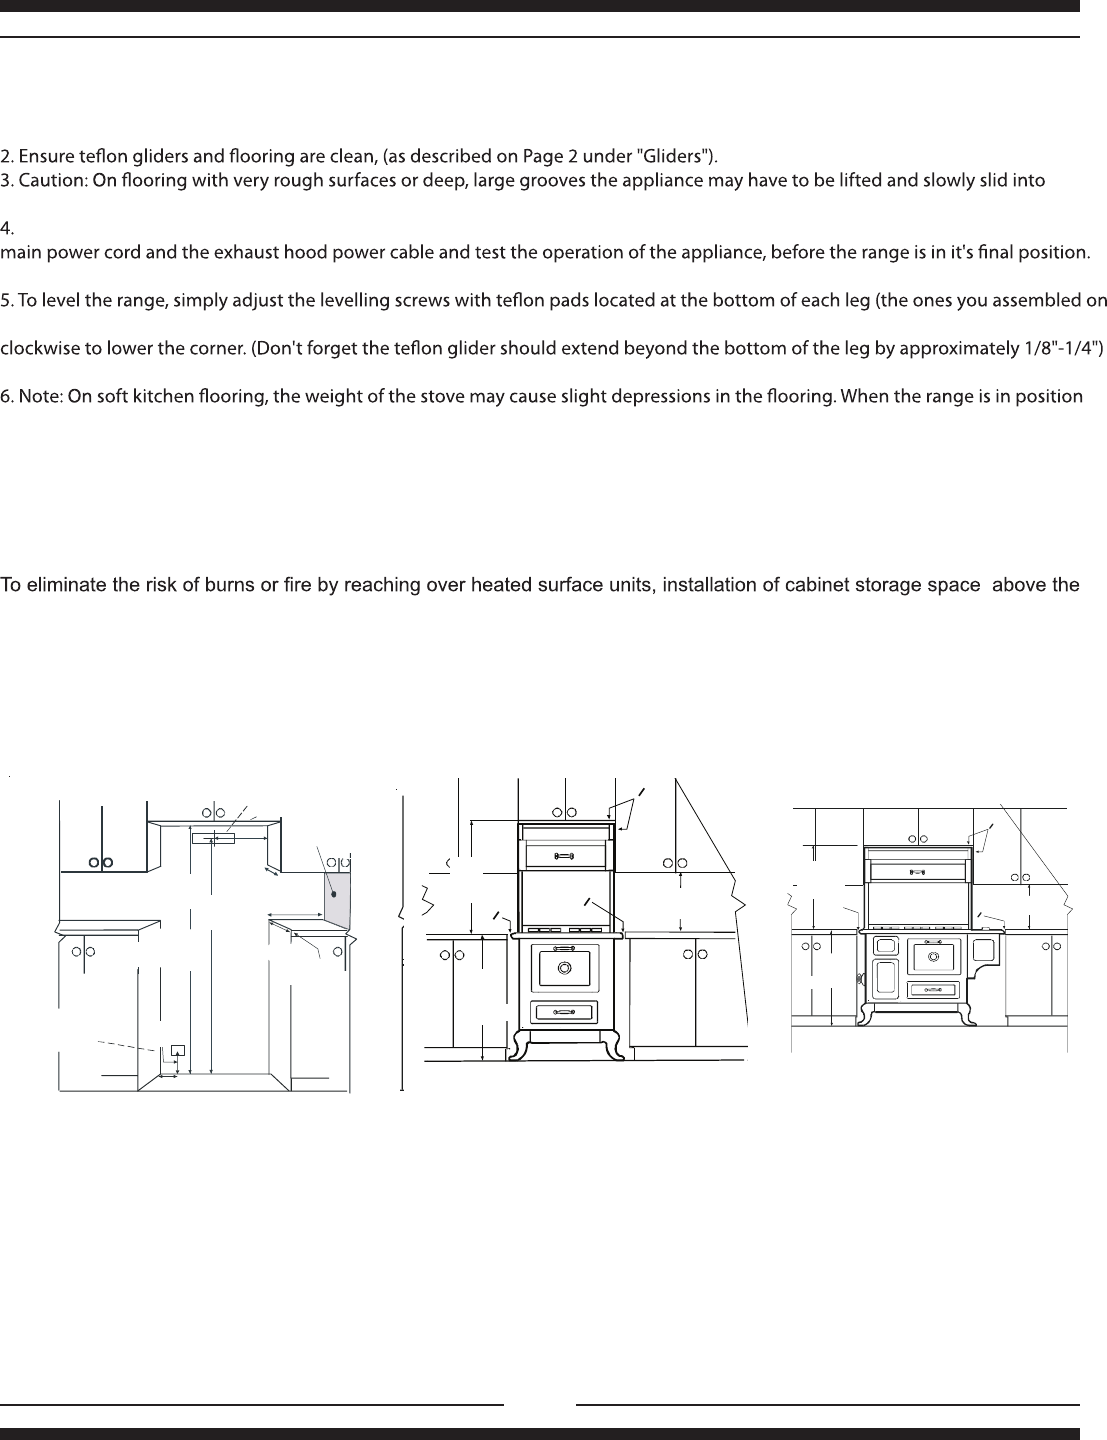
surface units should be avoided. If there is existing closet storage space have at least 30 1/4" (768 mm) of clearance.
For best cooking results, your range should be level. This can be checked with a carpenter’s level on top of the cooking
surface and across the oven rack. If levelling is required, adjust the leveller screws under one or more of the legs (see
"Positioning the Range" step 5).
min 18"
457 mm
0
0
0
min
30 1/4"
768 mm
max
36 "
914 mm
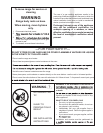
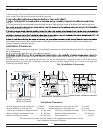
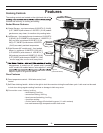
Model 5210 48" Installation Clearance
Model 4210 30" Installation Clearance
The clearances in the table are also stated on the rating plate located at back of stove.
(see "Installation Clearances" diagram)
Installation Clearances
Surface adjacent to cook top-left (48") 1” (25mm) Surface adjacent to cook top-right (48") .......0” (0 mm)
Surface adjacent to cook top (30") 0” (0 mm) Surface adjacent to warming oven ...............0” (0 mm)
Cook top to underside of adjacent closets ...18” (457 mm) Cook top to underside of closets .... 30 1/4” (768 mm)
Maximum depth of overhead closets ............13” (330 mm) Maximum depth of counters ..................24” (610 mm)
Maximum height of counters ..........................36” (914 mm) Rear clearance 0” .........................................(0 mm)
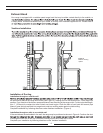
Fig 3 Installation Clearances
min 18"
46 cm
0
0
1"
2.5 cm
min
30 1/4"
77 cm
min
36 "
92 cm
(see Fig 3)
Positioning the Range
1. When the range is fully assembled, recheck all electrical connections especially between the exhaust hood and the back of the
range. As well, check that all nuts and bolts have been tightened.
position.
See closet installation instructions.
Page 2 under "Gliders"). Using a 5/16 (8mm) open end wrench turn the adjusting screw clockwise to raise up the corner, and counter-
Ensure the unit is perfectly level, or utensils may fall of during cooking.
Put both hands on the trim and carefully push the range into place. Make sure floor is clear of all debris. Don't forget to plug in the
iand levelled, you may want to place coasters under the teflon gliders of each leg to protect the floor. Remove the coasters when
moving the range for cleaning or servicing.
Installation Requirements
Due to continuing product improvements, AGA Marvel reserves the right to amend specifica-
tions without notice. Please contact AGA Marvel for the most up to date information, as it applies to product
being purchased, or download latest Site Preparation Specifications from www.heartlandapp.com.
Help Desk
800-223-3900
2
© 2010 AGA MARVEL
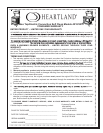
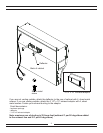
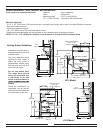
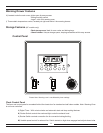
Rough In
Measurements
Dimensions
52”
(132 cm)
with bottom drawer fully open
43-3/4”
(111 cm)
with oven
door open
0” clearance
to the back
3” (7.6 cm)
14”
(36 cm)
29-1/2”
(75 cm)
Models 4200/4210 (page 2 of 2)
0
0
0
30-1/4”
(77 cm)
Min 18”
(46 cm)
36”
(92 cm)
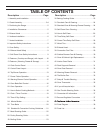
62-3/8”
(159 cm)
3-7/8”
( 10
cm)
28”
(72 cm)
29-3/4”
(76 cm)
36-1/8”
(92 cm)
11-3/8”
(29 cm)
27-1/2”
(70 cm)
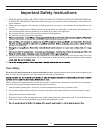
3
3
/
4
"
/ 9.5 cm.
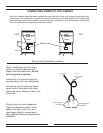
Range Hood
Outlet : 3 1/4"x 10"
8.3 Cmx 25.4 cm
34 "
86.4 cm
36 1/8"
92 cm
29 3/4"
76 cm
62 3/8"
159 cm
66 1/4"
168.3 cm
13 3/4 "
35 cm
Exhaust
Hood In
56"
142.3 cm
PowerIn
(
8 ft (2.4m) cord
supplied
direct
connection)
Gas Inlet-1/2 NPT
6” (16 cm)
13-3/4”
(35 cm)
(
Range Hood Outlet 3-1/2” x 10-1/2”
8.9 x 26.7 cm)
Receptacle Location
(use flush mounting
juction box)
counter
depth
24”
(61 cm)
5”
(13 cm)
66 3/4”
(169.5 cm)
with std cresting
56”
(142 cm)
cabinet depth
(33 cm)
13”
12”
(30.5 cm)
(6” clearance to any
combustible wall)
62 7/8”
(160 cm)
without cresting
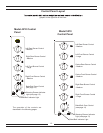
Rough in Opening
Model 4210 shown