


6
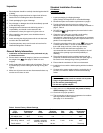
Inspection
1. Each shipment should be carefully checked against the bill
of lading.
2. The shipping receipt should not be signed until all items
listed on the bill of lading have been accounted for.
3. Check packaging for signs of damage.
4. Any shortage or damages should be immediately reported
to the delivering carrier.
5. Damaged material becomes the delivering carrierʼs
responsibility, and should not be returned to the
manufacturer unless prior approval is given to do so.
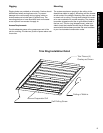
6. When unpacking the system, care should be taken to
prevent damage.
7. Avoid removing the shipping base until the unit has been
moved to the final destination.
8. Complete warranty return card for each unit and mail to
Heatcraft Refrigeration Products.
General Safety Information
1. Installation and maintenance to be performed only by
a licensed contractor.
2. Ensure that the structural integrity of the box can withstand
the weight of the (See page 2, Table 3 for unit
weights).
3. Avoid contact with sharp edges and coil surfaces. They are
a potential injury hazard. Wear gloves during moving and
rigging.
4. Make sure all power sources are disconnected before any
service work is done on units.
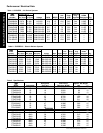
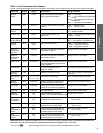
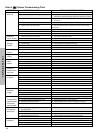
Table 4. Control Factory Default Settings
Defrost Defrost Defrost
PTN Temperature Start Duration Drip Fan Termination
Models Set Points Times (Maximum) Time Delay Set Point
Cooler Models
All cabinet sizes 35°F 3 / day n/a --- --- 38°F
Freezer Models
Med. & Lg. cabinet -10°F 4:00 AM, 10:00 AM, 40 min. 2 min. 2 min. 65°F
4:00 PM, 10:00 PM
Small cabinet 0°F 4 / day 20 min. --- --- Time only
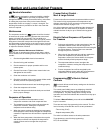
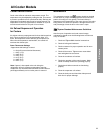
1. Ownerʼs Operating Instructions
Standard Installation Procedure
PTN Models
For Indoor Use Only
1. Inspect packaging for shipping damage.
Open package and inspect unit for concealed damage.
2. Review the space and location requirements on page 5.
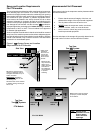
3. Provide a finished opening in the box ceiling, to the
appropriate dimensions and structural strength as stated on
page 2, Table 3.
4. DO NOT remove or disengage any box cam-locks in order
to install the
unit.
5. Clean the roof of the box to provide a good sealing
surface for the unit weatherstrip. Refer to box
manufacturerʼs instructions for any procedures or processes
necessary to ensure the integrity of the exposed foam in the
panels is not compromised.
6. Check the mounting surface with a level. units require
a surface that is within 1° of level or better and no more
than a 5/8" drop per 3 feet (17mm drop per meter).
7. For walk-in boxes with aluminum top panels, it is
recommended that a thermal break be placed on the roof
adjacent to the opening to prevent the possibility of
sweating.
8. Place the unit gently into the provided opening with the
evaporator air flow directed toward the door (See page 5).
Be careful not to damage the grill during installation.
9. Ensure that the condenser air flow is not obstructed.
10. Install the trim around the inside opening with the hardware
provided.
11. Connect unit to power supply using the cord with plug, if
provided, or hard wire. Adhere to local electrical/wiring
codes.
IMPORTANT:
•
Do not use extension cords to connect unit to power.
•
Plug-in to grounded three prong outlet.
•
Do not remove grounding prong.
•
Do not use a power adapter.
12. Apply power to unit.
All controls are preset to factory
default settings (See Table 4).
13. Check unit for proper operation.
14. The correct time of day may be programmed on medium
and large cabinet freezer systems
(See page 11 for instructions).