


– 10 –
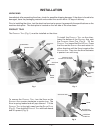
Using the Knife Removal Tool Accessory
Unplug the machine power cord and
turn the index knob fully clockwise to close the
gauge plate before cleaning the slicer.
To Remove the Knife . . .
• Remove the TOP KNIFE COVER and the plastic RING
GUARD COVER (Figs. 13, 14). Remove the plastic cover
from the K
NIFE NUT.
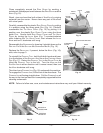
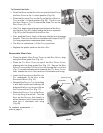
Orient the Knife . . .
• Rotate the KNIFE using your hand on the back of the
knife, the R
IDGE on the KNIFE HUB must align with the PIN
on the RING GUARD at the 1 o'clock position (Fig. 19).
• Arrows on the K
NIFE point to the three PINS on the RING
GUARD.
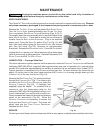
Attach the Knife Removal Tool . . .
• Place the KNIFE REMOVAL TOOL on the KNIFE. The three
slots on the T
OOL fit the three PINS ON THE RING GUARD
(Fig. 20). The PIN on the KNIFE REMOVAL TOOL fits the
hole in the K
NIFE at the 11 o'clock position (Fig. 21).
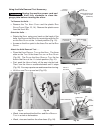
• First, push the H
ANDLE firmly, all the way into the hub.
Then, turn the H
ANDLE counterclockwise until it stops
(Fig. 22). You may experience resistance when turning.
• Lift K
NIFE and TOOL up and out (Fig. 23).
RIDGE ON KNIFE HUB
(PLASTIC COVER
REMOVED)
PIN @
1 O’CLOCK
HOLE @
11 O’CLOCK
KNIFE REMOVAL
TOOL
PIN IN HOLE @
11 O’CLOCK
SLOTS
AROUND
3 PINS
HANDLE
PIN @ 11
O’CLOCK
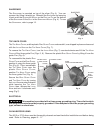
KNIFE REMOVED
KNIFE
NUT
RING
GUARD
KNIFE HUB
RIDGE
PIN
Fig. 19
Fig. 21
Fig. 23
Fig. 20
Fig. 22
Fig. 24
• Wash, rinse and sanitize the KNIFE and KNIFE REMOVAL
TOOL in a sink or dishwasher.
• Wash, rinse and sanitize the slicer base (Fig. 24).