


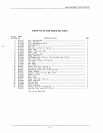

6.2 Remove the camage (section 7) and set the
slice adjusting dial at 50.
6.3 Remove the sharpener from its storage place.
6.4 Unscrew the thumb screw on the sharpener
until the sharpener slips upward into the slot (8,
Fig. 1) at the bottom of the gage plate. Push the
sharpener firmly upward with the right hand to
remove any rocking tendency. Tighten the
thumb screw with the left hand.
6.5 Start the motor.
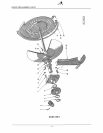
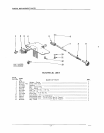
Fig.
3
knife with cloth that has been dipped in
cleaning solution.
5.2.7 Wash the knife guard.
5.2.8 Rinsing and sanitizing can be done by
going over all cleaned surfaces with a cloth
that has been soaked in "Mikro-Klene" rinse
solution and wrung out enough so that the
solution does not run over the machine but
still leaves it wet.
5.2.9 Reassemble knife guard by placing center
stud in the mounting hole and lowering knife
guard down over knife. Lock knife guard into
position with locking knob.
5.2.10 Allow all surfaces to dry. Do not wipe.
Cover slicer until next use.
5.2.1 1 Cloth used for rinsing should be
laundried or discarded. Wash out pails.
CAUTION: Do NOT wash polished alumi-
num parts in dish or pan washer.
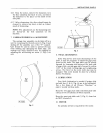
6. SHARPENING:
This machine is furnished with a Hobart
"Stay-
Sharp" stainless steel knife. It should be sharpened
only when necessary. When not in use, hang the
sharpening unit in the notch (1, Fig.
3)
of the side
panel. Use the thumb screw to secure the sharpen-
er in position on the inside of the machine. The
following sharpening procedure is recommended:
6.1 With the slice adjusting dial set at zero and the
guards in place, wash all the grease from the
exposed portion of the knife.
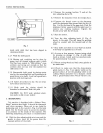
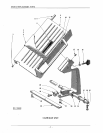
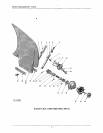
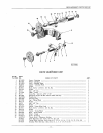
6.6 Turn the slice adjusting knob (2, Fig. 4)
slowly to the right. This will bring the grinding
wheel in contact with
the beveled side of the
knife.
6.7 Stop knife and check to see if burr has started
to develop on opposite face of knife.
6.8 As soon as burr appears, depress truing wheel
by pressing on plunger (1, Fig. 4) with right
hand as shown. Grind and true simultaneously
for approximately 3 seconds.
6.9 Release truing wheel and back away grinder at
the same time.
6.1 0 Check to make sure that the characteristic
grind marks (1, Fig. 5) are plainly visible on the
ground surface, if not the grinding wheel is not
cutting. (Many operators try to sharpen a knife
with a grease-loaded stone which will not cut).
Fig.
4