


– 4 –
INSTALLATION
UNPACKING
Immediately after unpacking the oven, check for possible shipping damage. If the oven is found to be
damaged, save the packaging material and contact the carrier within 15 days of delivery.
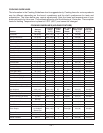
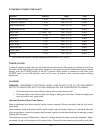
Prior to installation, verify that the electrical service agrees with the specifications on the oven data
plate, located on the inside of the top front cover.
Do not use the doors or their handles to lift the oven.
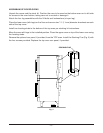
LOCATION
The installation location must allow adequate clearances for servicing and proper operation. For solid
state and digitally controlled models, there must be 18" (45 cm) of clearance on the right side of the oven
from any open flame.
INSTALLATION CODES AND STANDARDS
In the United States, install the oven in accordance with: 1) State and local codes; 2) National Electrical
Code, NFPA-70 (latest edition) and 3) NFPA Standard #96,
Vapor Removal from Cooking Equipment
(latest edition), available from National Fire Protection Association, Batterymarch Park, Quincy, MA
02269.
In Canada, install the oven in accordance with: 1) Local codes; 2) Canadian Electrical Code, CSA
Standard C22.2 No. 1 (latest edition) and 3) Canadian Standard for Commercial Cooking Equipment
CSA Standard C22.2 No.109 (latest edition).
INSTALLING BASIC OVEN
The basic oven must be installed on legs or mounted on a modular stand. Installations on concrete
bases or other supports restricting air circulation underneath the oven is not advisable and may void
the warranty. If using the modular stand, set the oven on the stand after unpacking.
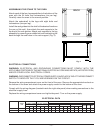
ASSEMBLING THE LEGS TO THE SINGLE OVEN
The legs must be installed on the bottom of the oven. Gently position the oven on its left side, taking
care not to cause scratches or damage.
Attach each of the four leg assemblies to the bottom of the oven with the 24 bolts and lockwashers
(six bolts and lockwashers per leg). Carefully raise the oven to its normal position.
LEVELING
Adjust the legs to ensure that the oven racks are level in the final installed position.
CASTERS
If the oven is to be installed on casters, assemble the casters to the legs provided. Then attach the
caster-leg units to the oven at each corner using the 24 bolts and lockwashers (six bolts and
lockwashers per leg). Place the locking casters on the front legs and nonlocking casters on the rear
legs.