


– 7 –
ELECTRICAL CONNECTIONS (Stacked Ovens)
WARNING: ELECTRICAL AND GROUNDING CONNECTIONS MUST COMPLY WITH THE
APPLICABLE PORTIONS OF THE NATIONAL ELECTRICAL CODE AND/OR OTHER LOCAL
ELECTRICAL CODES.
WARNING: DISCONNECT ELECTRICAL POWER SUPPLY AND PLACE A TAG AT THE DISCONNECT
SWITCH TO INDICATE THAT YOU ARE WORKING ON THE CIRCUIT.
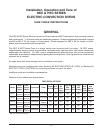
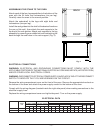
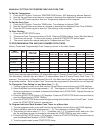
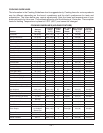
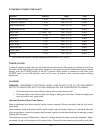
Make sure that the electrical power supply agrees with the specifications on the oven data plate, the
wiring diagram on the oven and Electrical Data, page 5.
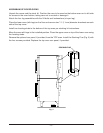
1. Wires to connect both ovens are provided with each oven. Carefully route these leads from the
top oven through the bushing (supplied with the stacking kit) through the electrical access
knockout holes common to both ovens.
2. Connect wires X, Y and Z from the upper oven to the lower oven per the wiring diagram using wire
nuts provided. Attach the power supply conduit to the bottom of the lower oven. Connect the power
supply leads to the line side of the terminal block on the bottom oven.
3. Finally, inspect and check all wiring and terminal connections for tightness or pinch points (cover
on oven frame).
4. Refer to reference drawing 426986 supplied with the stacking kit for electrical connection
instructions.
5. Refer to instructions supplied with the stacking kit for marking the combined electrical load
information to the electrical data plate of the bottom oven.