


– 9 –
OPERATION
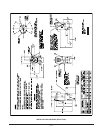
Using the lugs on the hopper top as locators, position the hopper top on the housing and turn it
clockwise into place.
Close and latch the discharge chute door.
Pour the product into the hopper. There should be room in the hopper for the product to move around
while peeling. Do NOT overload the peeler; peeler capacities are 30 to 33 lbs (13.5 to 15.0 kg)
maximum for the 6430/6430T and 50 to 60 lbs (22.5 to 27.0 kg) for the 6460/6460T.
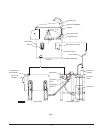
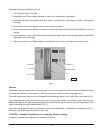
Turn on the water supply. On units with a disposer , turn on the disposer switch (Fig. 1). This will open
the valve.
Turn on the peeler. On units equipped with a timer, set the timer at the desired time.
Peeling times will vary depending on the type and condition of product. When the desired degree of
peeling has been reached, turn off the water (or disposer where applicable). Place a container to catch
the product under the discharge chute door.
NOTE: On units equipped with a timer, if the timer has expired, it will be necessary to reset the timer
to allow enough time for the product to be discharged.
After the product has been completely discharged, turn off the peeler and it is ready for a repeat
operation.
If the peeler is equipped with a peel trap, it will be necessary to empty the peel trap drawer occasionally
(after a few batches).
WARNING: DISCONNECT THE ELECTRICAL POWER TO THE MACHINE AND FOLLOW
LOCKOUT / TAGOUT PROCEDURES.
CLEANING
The peeler should be cleaned after the peeling operation has been completed.
As soon as the peeling operation has been completed and BEFORE the hopper has had time to dry,
turn on the water or disposer, if equipped, and flush the interior of the hopper. Turn off the water (or
disposer).
Rotate the hopper top COUNTERCLOCKWISE and lift to remove. Clean the hopper top in a sink.
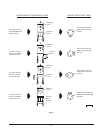
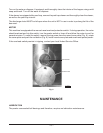
Lift out the abrasive disc (Fig. 1), which is NOT fastened to the shaft and scrub it with a brush and mild
soap. Clean the housing beneath the abrasive disc with mild soap and water.
NOTE: If the abrasive disc should stick and is NOT easily removed, it may be loosened by removing
the hex head screw (Fig. 1) on top of the hub and threading a longer screw (such as
5
/16"-18 x
1-
1
/2") in until disc loosens.
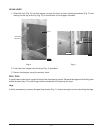
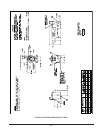
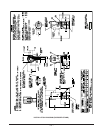
To remove the lexan liner, unlatch the exterior latch on the outside of the hopper and push the keeper
out of the hole (Fig. 3). Slide the liner out from under the retaining brackets. Take to the sink and scrub
with a nonabrasive brush, using soap and water to clean. Allow to air dry before installing into the
hopper.