


– 13 –
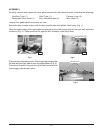
NOTE: If power to rotisserie oven has been interrupted, the time of day must be set, or the rotisserie
oven will not operate.
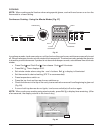
• To set the time of day, press and hold Cook
and Cook End while using the – and + buttons.
• The beeper has three volumes and can be set by pushing and releasing the – and + buttons at
the same time. Ensure that the beeper is audible (Fig.15).
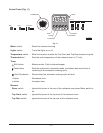
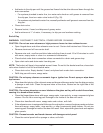
Motor Lights Temperature
Burners
Show Top Front
Top Rear
A
F
200
122
572
300 400
500
O
THERMOSTAT TIMER
COOK END
COOK
DECREASE
BELL INCREASE
PL-56352
Fig. 15
PREHEAT ROTISSERIE OVEN
• Turn on lights switch (Fig. 15).
• Turn the motor switch on (Fig. 15).
• Turn show burner switch on (Fig. 15).
• Check to see that shown burner is lit.
• If burner does not ignite, turn show burner switch on and off again.
• Preheat the rotisserie oven for 15 to 20 minutes.
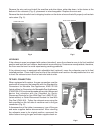
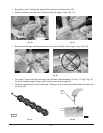
PREPARING CHICKENS FOR ROASTING
The rotisserie oven is not designed to roast frozen foods. Use only fresh or properly thawed product.
• Bring chickens from cooler.
• Check temperature of chicken; temperature should be between 37°F to 42°F (2.8°C to 5.6°C).
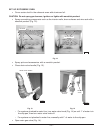
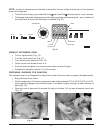
Insert approved popper into chicken breast, if available. Popper will pop up when chicken is
done (Fig. 16).
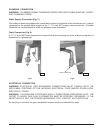
• Wrap the end of approved tie around the legs of chicken. Pull up and crisscross over back
(Fig. 17).
POPPER
PL-41694-1
PL-41695-1
Fig. 16 Fig. 17