


– 9 –
SLICING — MODEL 2912PS
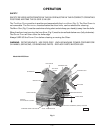
With the Gauge Plate fully closed, pull the Carriage all the way toward you until it reaches its stop. With
the Meat Grip out of the way, place the product to be sliced on the Carriage Tray. Adjust the fence by
loosening the thumb screw and sliding the fence so that it is close to the product but not pushing against
it. Tighten the thumb screw. Set the Meat Grip against the product. To operate the slicer in manual
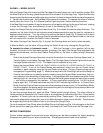
mode, place the Lever (Fig. 2) in Manual position (pointing down) before starting the slicer.
If the Meat Grip is not needed, it may be stored out of the way by sliding it to the top of its travel, rotating
it under the Carriage Tray, and allowing it to rest in the Retaining Clip (Fig. 2).
Adjust the Gauge Plate by turning the Index Knob (Fig. 2) to obtain the desired slice thickness. The
numbers on the Index Knob do not indicate actual measurements but may be used for reference to
duplicate slice thickness. Turn the slicer on by pulling the Switch Knob (Fig. 2) forward until it starts
and then releasing it. Unless the Gauge Plate is opened before pulling the Switch Knob on, the slicer
will not continue to run when the Switch Knob is released.
Use either Carriage Tray Handle (Fig. 2) to push the Carriage back and forth to slice manually.
In Manual Mode, turn the slicer off by pushing the Switch Knob or by closing the Gauge Plate.
To operate the slicer in Automatic mode . . . With the Carriage in H
OME position (all the way
forward), the Lever on the Automatic position (pointing to the right), the Gauge Plate adjusted to the
desired slice thickness, and the slicer Switch Knob pulled on, the slicer is ready to begin Automatic
slicing.
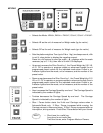
Select the desired Carriage Speed by using the Hare button to increase Carriage Speed and / or
Tortoise button to decrease Carriage Speed. The Carriage Speed indicator lights will show the
Carriage Speed selected (1 to 6). The speed can be adjusted at any time.
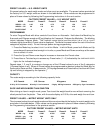
Select the desired Mode:
WEIGH LB, PRESET WEIGH LB, WEIGH OZ, PRESET WEIGH OZ, COUNT, or
PRESET COUNT. If one of the Preset Modes was selected, select from the six Preset values
available in each category using the Up and Down arrow keys. [ Factory Preset values can be
changed per Programming, page 7.] Modes that begin with the Preset light off and the Weight or
Count at zero allow you to select a specific value by using the Up and Down arrow keys; this non-
zero selection then works like a Preset value. If slicing begins with zero displayed and the Preset
indicator light off, the slicer Counts Up or Weighs the actual platter weight as each slice is made
— until slicing is stopped by the operator. In Count mode after counting from 1 to 99, the slicer
begins again at 0. If a Preset value was set, the
PRESET indicator light will be on. In Preset Count
Mode, the slicer Counts Down one as each slice is made and stops at zero. In Preset Weigh Mode,
the slicer displays the platter weight and stops slicing with the carriage at Home position when the
platter weight reaches the Preset value.
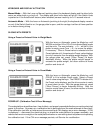
To start the carriage drive unit, push the Slice / Pause button to begin slicing. The slicer returns to
Home position at completion of a Preset cycle or at completion of a slice after the Slice / Pause button
is pushed. A Preset cycle can be resumed by pushing Slice / Pause again. The carriage drive unit
can also be stopped by rotating the Lever to the Manual position (down and to the left). The slicer can
be stopped by pushing the Switch Knob or by closing the Gauge Plate.
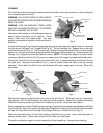
To use the optional Food Chute, place the Meat Grip on the Retaining Clip, fit the hangers on the Food
Chute around the meat grip slide rod (at front), and lower the Food Chute onto the Carriage Tray.
METRIC CONVERSION
Portion scales equipped for pound and ounce weighing can be field converted for metric weighing
(kilogram and gram) by your service technician. A new keypad would need to be installed.