


– 9 –
CLEANING
WARNING: DISCONNECT THE ELECTRICAL POWER SUPPLIES BEFORE CLEANING OR
SERVICING THIS MACHINE.
The machine must be thoroughly cleaned at the end of each working shift, or at least twice a day. Use
only products formulated to be safe on stainless steel.
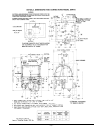
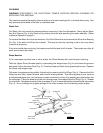
Wash Arm
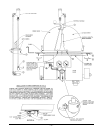
The Wash Arm can usually be cleaned without removing it from the dishwasher. Swing up the Wash
Arm End Covers (Fig. 4) and flush out by closing the hood and operating the wash manually. (Refer
to Manual Operation, page 8.)
To remove the Wash Arm from the machine, lift off the Rinse Arm and unscrew the Rinse Arm Bearing
Pin (Fig. 4) on which the Rinse Arm rotates. This may be done by inserting a rod in the cross holes
to serve as a wrench.
If the arm should stop revolving, first make sure that the tank is full of water. Then make sure that all
wash arm nozzles are clean.
Rinse Nozzles
If the rinse water contains lime or other solids, the Rinse Nozzles will need frequent cleaning.
Take the Upper Rinse Nozzles apart by unscrewing the winged caps (Fig. 4) and clean the grooves
and center hole in the loose Core (Fig. 4). Close the hood and flush out by operating the rinse. Replace
the Cores and winged caps.
The lower rinse pipes can be quickly flushed out by removing the End Plugs (Fig. 4). Remove the End
Plugs one-at-a-time, close the hood, and rinse for a few seconds. Then force a piece of wire, such as
a straightened paper clip, into the spray nozzles one side at-a-time, thus pushing any obstruction into
the rinse pipe. Close the hood and rinse for a few seconds, then replace the End Plug (Fig. 4). Repeat
for other side. Complete removal of the rinse pipes (Fig. 4) is accomplished by loosening the set screws
(Fig. 4). Do not change the angled settings of the rinse nozzles from the factory preset angles.
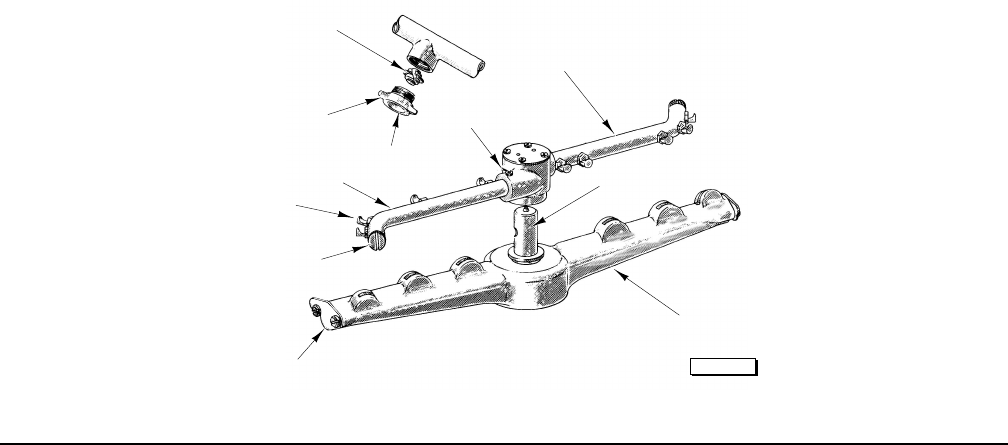
Fig. 4
PL-53055
CORE
WINGED CAP
UPPER RINSE NOZZLE
RINSE PIPE
SET SCREW
RINSE NOZZLE
END PLUG
WASH ARM
END COVER
WASH ARM
RINSE ARM BEARING PIN
RINSE PIPE