


– 11 –
PL-40071-1
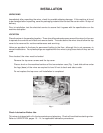
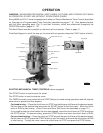
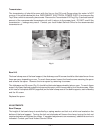
Wire Cage Rotated Left
Latch
Ridge On Drip Cup
Rear Retainer
Splash Guard
Wire Cage Front-Center Position
Front-Center
Retainer
Centering Ramp
Black Release Knob
Centering Pin
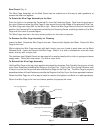
Bowl Guard (Fig. 4)
The Wire Cage Assembly on the Bowl Guard can be rotated out-of-the-way to add ingredients or
access the bowl and agitator.
To Rotate the Wire Cage Assembly to the Rear
Push the Latch in to release the Centering Pin from the Centering Ramp. Note how the grooves on
the nylon Retainers allow the Wire Cage to ride around the circular Ridge of the planetary Drip Cup.
The Wire Cage can rotate 360° to the left or right. When the Wire Cage returns to the front and center
position, the Centering Pin is captured and held by the Centering Ramp, restricting rotation of the Wire
Cage until the Latch is pressed again.
The Wire Cage must be in the front-center position for the mixer to operate.
To Remove the Wire Cage Assembly for Cleaning
Lower the Bowl. Rotate the Wire Cage to the rear. Remove both Agitator and Bowl. Return the Wire
Cage to the front.
While holding the Wire Cage securely with both hands, use your thumb to push down on the Black
Release Knob. Lower and remove the Wire Cage. Wash it in a sink or dishwasher, rinse with clear
water, and dry with a clean cloth.
The stainless steel Splash Guard can be wiped off or washed easily with a cloth or sponge and warm
soapy water. Rinse with clear water. Dry with a clean cloth.
To Reinstall the Wire Cage Assembly
Hold the Wire Cage so its top ring is positioned around the planetary Drip Cup with the grooves in both
nylon Rear Retainers straddling the Ridge on the Drip Cup. Push in the Front-Center Retainer until
it stays in and so that its grooves also straddle the Ridge on the Drip Cup. The Wire Cage is properly
assembled when all three Retainers straddle the Ridge on the Drip Cup in the three opposed locations.
Rotate the Wire Cage out-of-the-way to install or remove the Agitator and Bowl or to add ingredients.
Return the Wire Cage to its front and center position to operate the mixer.
Fig. 4