


– 12 –
Attachments (When Mixer is Equipped With Attachment Hub)
ALWAYS place the clutch lever on STOP and press the STOP button before installing or removing
attachments.
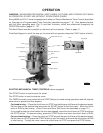
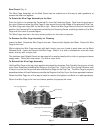
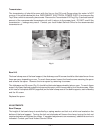
To install an attachment, loosen the attachment hub thumb screw and remove the plug. Insert the
attachment into the attachment hub, making certain that the square shank of the attachment is in the
square driver of the mixer. Secure the attachment by tightening the thumb screw.
Move the gear shift lever to the desired speed. Move the clutch handle to RUN. With the bowl support
all the way up and the wire cage in the front-center position, start the mixer to operate the attachment.
The meat and food chopper attachment should be operated in second or third speed. If material in the
cylinder stalls the mixer, push the STOP button at once. DO NOT attempt to restart the mixer in a lower
speed — remove the adjusting ring, knife, plate, and worm and clear any obstruction. THIS
ATTACHMENT MUST NOT BE USED TO CHOP BREAD CRUMBS.
NOTE: Attachment hub should not be used while mixing.
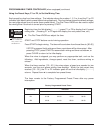
Mixer Speeds
Speed 1 (Low) — This speed is for heavy mixtures such as pizza dough, heavy batters and potatoes.
Speed 2 (Medium-low) — This speed is for mixing cake batters, mashing potatoes and developing
bread dough.
Speed 3 (Medium-high) — This speed is for incorporating air into light batches, as well as finishing
whipped items.
Speed 4 (High) — This speed is for maximum and accelerated air incorporation into light batches.
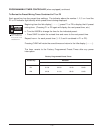
Bowl Scraper Attachment
The Mixer Bowl Scraper Attachment (when ordered) is provided with a separate instruction manual
covering its installation, operation, use and care.
CLEANING
WARNING: DISCONNECT ELECTRICAL POWER SUPPLY AND PLACE A TAG AT THE
DISCONNECT SWITCH INDICATING THAT YOU ARE WORKING ON THE CIRCUIT BEFORE
BEGINNING ANY CLEANING PROCEDURE.
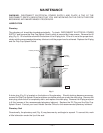
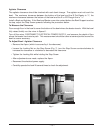
A flat scraper and a brush are furnished to aid in cleaning bowls and agitators.
The mixer should be thoroughly cleaned daily. DO NOT use a hose to clean the mixer — wash it with
a clean damp cloth. The base allows ample room for cleaning under the mixer. The apron may be
removed by loosening the thumb screws.
The Drip Cup-Splash Guard (which is secured by three screws) should be removed periodically and
wiped clean.
For cleaning the Bowl Guard (including both Wire Cage Assembly and Splash Guard), refer to page 11.