


EXCEL 10 W7753A UNIT VENTILATOR CONTROLLER
5 95-7520—02
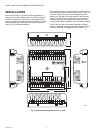
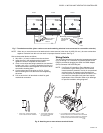
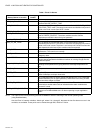
Fig. 7. Termination modules (place a wire nut on each remaining wire that is not connected to a controller or device).
NOTE: When two or more wires are to be attached to the same terminal, other than 14 AWG (2.0 mm
2
), be sure to twist them
together. Deviation from this rule can result in improper electrical contact. See Fig. 8.
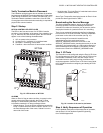
Wire to the terminal blocks as follows:
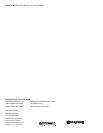
1. Strip 3/8 in. (10 mm) insulation from the conductor.
2. Insert the wire in the required terminal location and
tighten the screw to complete the termination.
3. If two or more wires are being inserted into one terminal
location, strip 1/2 in. (13 mm) of insulation from the con-
ductors then twist the wires together a minimum of three
turns before inserting them.
4. Cut the twisted end of the wires to 3/16 in. (5 mm)
before inserting them into the terminal and tightening
the screw.
5. Pull on each wire in all terminals to check for good
mechanical connection.
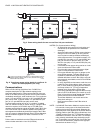
Wiring Details
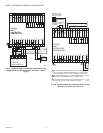
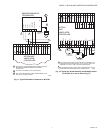
The W7753A Controller has the terminal arrangements shown
in Fig. 9 through 14. Connection for operator access to the
E-Bus is provided by plugging the Serial LonTalk® Adapter
(SLTA) connector into the E-Bus jack.
NOTE: If an Excel 10 Controller or Zone Manager is not
connected to a good earth ground, the controller
internal transient protection circuitry is compromised
and the function of protecting the controller from
noise and power line spikes cannot be fulfilled. This
can result in a damaged circuit board and require
replacement of the controller. Refer to job drawings
for specific installation wiring diagrams.
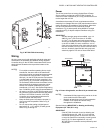
Fig. 8. Attaching two or more wires at terminal blocks.
M12690
PART NO. 209541B
TERMINATION
MODULE
PART NO. 209541B
TERMINATION
MODULE
W7753A
1415 1415
W7753A
1415
W7753A
BROWN
BROWN
ORANGE
ORANGE
3/8
(10)
STRIP 3/8 IN. (10 MM) FROM WIRES
TO BE ATTACHED AT ONE TERMINAL.
1. 2. TWIST WIRES TOGETHER
WITH PLIERS (A MINIMUM
OF THREE TURNS).
TWO 14 AWG
(2.0 MM
2
) WIRES
3. CUT TWISTED END OF WIRES TO 3/16 IN. (5 MM)
BEFORE INSERTING INTO TERMINAL AND TIGHTENING
SCREW. THEN PULL ON EACH WIRE IN ALL TERMINALS
TO CHECK FOR GOOD MECHANICAL CONNECTION.
M10086