


19
Screws
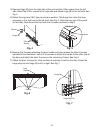
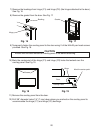
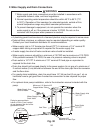
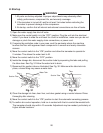
f) Remove hinge (C1) from the top right part of the door, ip it and reattach to the
bottom left. Remove hinge (C2) from the bottom right part of the door, ip it and
reattach to the top left. See Fig. 15. Proceed to step 7.
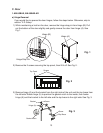
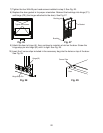
d) Remove hinge (B) from the right side of the unit and the 2 ller screws from the left
side. Attach the 2 ller screws to the right side and attach hinge (B) to the left side.
See Fig. 13.
e) Rotate the top panel 180° from its previous position. This brings the notch that was
previously in the right rear to the left front. See Fig. 14. Hook the rear part of the
panel on the body, then secure the front with the 2 screws removed in step 6a.
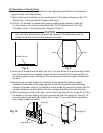
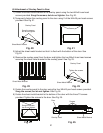
6) If you would like to reverse the door hinges, do the following:
a) Contact your local distributor to purchase Hoshizaki Kit HS-0229. The kit contains
"hinge(A)-left."
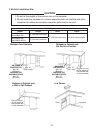
b) Remove the 2 screws securing the top panel, then lift it off. See Fig. 11.
c) Remove hinge (A)-right and the bracket from the right side of the unit. Set aside
hinge (A)-right; it is not needed. Remove the top brace from the left side. Fasten
hinge (A)-left and the bracket to the left side and the top brace to the right side. See
Fig. 12.
Note: When on the proper side, the gasket notch for hinge (A) is to the inside.
Fig. 11
Fig. 13
Hinge (B)
Filler
Screws
Notch
Top Panel
Fig. 14
Top Panel
Fig. 12
Hinge (A)-Left
Bracket
Screw
Top Brace
Gasket Notch
Screw
Hinge (C1)
Hinge (C2)
Fig. 15
Hinge (A)-Right
Not Needed
Screws
Screws
Screws