


6
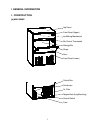
3. SET UP
IMPORTANT
Do not place heavy objects exceeding 33 lbs (15 kg) on the Top Panel.
1) Unpack the icemaker, and remove all shipping cartons, tapes
and packing BEFORE operating the unit.
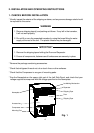
2) Position the icemaker in a selected site. Clean the interior
with soap and water and rinse thoroughly.
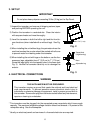
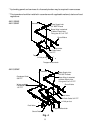
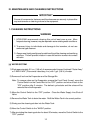
3) Level the icemaker in both the left-to-right and the front-to-
rear directions (when installed with or without legs). See Fig.
2.
4) When installing the unit without legs, the perimeter where the
machine touches the counter should be sealed with silicone
to prevent water from leaking under the icemaker.
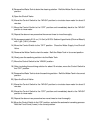
5) When installing the unit with legs on the bottom, use the four
accessory legs adjustable from 6” (15.2 cm) to 7” (17.8 cm).
Screw the legs tightly into the tapped holes in the base (see
Fig. 3). Handle the icemaker carefully not to damage the
exterior.
4. ELECTRICAL CONNECTIONS
WARNING
THIS APPLIANCE MUST BE GROUNDED.
This icemaker requires a ground that meets the national and local electrical
code requirements. To prevent possible severe electrical shock injury to
individuals or extensive damage to equipment, install a proper ground wire to
this icemaker. Remove the plug from the mains socket before any maintenance,
repairs or cleaning is undertaken.
* This icemaker must be plugged into the separated power receptacle which has enough
capacity. The maximum allowable voltage variation should not exceed ± 10 percent of the
nameplate rating. See the Nameplate.
* Usually an electrical permit and services of a licensed electrician are required.
Max. 0.4” (1 cm)
Fig. 2
Fig. 3
Tapped Hole
(Leg Mounting)
Base
Adjustable Leg