85
16) Evacuate the system, and charge it with refrigerant. For air-cooled and water-cooled
models, see the nameplate for the required refrigerant charge. For remote air-cooled
models, see the rating label inside the icemaker.
17) Replace the removed parts in the reverse order of which they were removed.
18) Replace the panels in their correct positions.
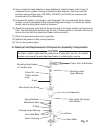
19) Move the drain switch to the "ICE" position. Then, turn on the power supply.
6. Removal and Replacement of Mechanical Seal and Lower Housing
6a. Mechanical Seal
1) Drain the water from the evaporator.
a) Move the power switch to the "OFF" position.
b) Move the control switch to the "DRAIN" position.
c) Move the power switch to the "ON" position and allow the water to drain from the
evaporator.
d) Move the power switch to the "OFF" position.
) Turn off the power supply.
3) Remove the panels.
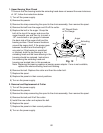
4) Remove the strap connecting the spout to the chute assembly, then remove the spout.
5) Remove the allen head cap screws securing the extruding head. Using the cutter, lift
out the auger assembly.
6) The mechanical seal consists of two parts. One moves along with the auger, and the
other is xed on the lower housing. If the contact surfaces of these two parts are worn,
cracked, or scratched, the mechanical seal may cause water leaks and should be
replaced.
7) Remove the allen head cap screws securing the evaporator to the lower bearing
housing.
8) Raise the evaporator up to access the lower housing.
9) Remove the O-ring and mechanical seal from the housing. If only replacing the
mechanical seal, proceed to step 1.
WARNING
To help prevent water leaks, be careful not to damage the surfaces of the
O-ring or mechanical seal.


