


51
VI. Cleaning and Maintenance
This icemaker must be cleaned and maintained in accordance with the instruction
manual and labels provided with the icemaker. Consult with your local distributor
about cleaning and maintenance service. To obtain the name and phone number of
your local distributor, visit www.hoshizaki.com or call Hoshizaki Technical Support at
1-800-233-1940 in the USA.
WARNING
1. Only qualied service technicians should attempt to service this icemaker.
2. CHOKING HAZARD: Ensure all components, fasteners, and thumbscrews
are securely in place after any cleaning or maintenance is done to the unit.
Make sure that none have fallen into the dispenser unit/storage bin.
3. The dispenser unit/storage bin is for ice use only. Do not store anything else
in the dispenser unit/storage bin.
A. Cleaning and Sanitizing Instructions
Hoshizaki recommends cleaning and sanitizing this icemaker at least twice a year. More
frequent cleaning and sanitizing, however, may be required in some existing water
conditions.
WARNING
1. To prevent injury to individuals and damage to the icemaker, do not use
ammonia type cleaners.
2. Carefully follow any instructions provided with the bottles of cleaning and
sanitizing solution.
3. Always wear liquid-proof gloves and goggles to prevent the cleaning and
sanitizing solutions from coming into contact with skin or eyes.
4. After cleaning and sanitizing, do not use ice made from the cleaning and
sanitizing solutions. Be careful not to leave any solution on the parts or in the
dispenser unit/storage bin.
1. Cleaning Solution
IMPORTANT
For safety and maximum effectiveness, use the solution immediately after
dilution.
Dilute9.6.oz.(0.29l)ofHoshizaki"ScaleAway"with1.6gal.(6.0l)ofwarmwater.
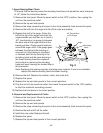
2. Cleaning Procedure
1)Removethefrontpanel,thenmovethepowerswitchtothe"OFF"position.Movethe
controlswitchtothe"DRAIN"position,thenmovethepowerswitchbacktothe"ON"
position. Replace the front panel in its correct position.
2) Close the water supply line shut-off valve.
3) Allow the water system to drain for 5 minutes.
4)Removethefrontpanel.Movethepowerswitchtothe"OFF"position,thenunplugthe
unit from the electrical outlet. Remove the top panel.