


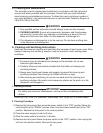
52
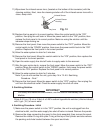
7) Pour the cleaning solution over the extruding head until the evaporator assembly and
thereservoirarefullandthesolutionstartstooverowintothedrainpan.
Note: If there is excess scale on the extruding head, ll the evaporator assembly and
reservoir as described above, then use a clamp on the reservoir hose between
thereservoirandevaporatorassemblytoblockow.Pouradditionalcleaning
solution over the extruding head until the evaporator assembly is completely full.
8) Replace the spout and strap in their correct positions.
9) Allow the icemaker to sit for about 10 minutes before operation. If you placed a clamp on
the reservoir hose in step 7, remove it before operation.
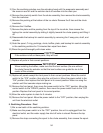
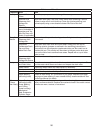
10)Inbadorseverewaterconditions,cleantheoatswitchassemblyasdescribedbelow.
Otherwise, continue to step 11.
a.Removetheoatswitchassemblyfromthereservoircover.
b.Wipedowntheoatswitchassemblywiththecleaningsolution.
c.Rinsetheoatswitchassemblythoroughlywithcleanwater.
d.Replacetheoatswitchassemblyinitscorrectposition.
Reservoir
Reservoir Cover
Float Switch Assembly
Fig. 10
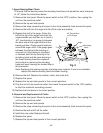
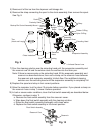
5) Remove all of the ice from the dispenser unit/storage bin.
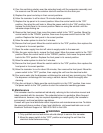
6) Remove the strap connecting the spout to the chute assembly, then remove the spout.
See Fig. 9.
Fig. 9
Strap
Spout
Chute
Rubber O-Ring
Packing
Proximity Switch
Packing
Ties
(Hook and Loop)
Chute Insulation
Baffle
Plate
Packing
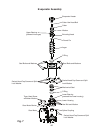
Backup Bin Control Assembly Mount
Actuator
Shaft
Extruding Head
Evaporator Assembly
Nylon O-Ring
Reservoir
Chute
Bracket
Infrared Sensor Lens
Float Switch
Assembly
Reservoir Cover
Reservoir
Hose