


5
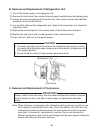
F. Removal and Replacement of Thermistors
1) Turn off the power supply, and unplug the unit.
) Remove the front panel, then remove the wire guard located below the display panel.
3) Unhook the wiring connectors at the control box, then remove the two hex-head M6
attachment nuts and the M5 bolt.
4) Very carefully slide out the refrigeration system. Support the evaporator as it clears
the evaporator case. For the remainder of the procedure, see the appropriate section
below.
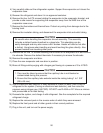
Cabinet Thermistor
5) Cut the cable tie holding the cabinet thermistor to the bracket attached to the fan motor
side of the evaporator shroud. Remove the thermistor.
6) Remove the thermistor wire connection (below the control box).
7) Install the new thermistor and return the refrigeration unit to its proper position in the
reverse order of the removal procedure.
8) Plug in the unit, and turn on the power supply.
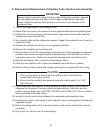
Defrost Thermistor
5) The defrost thermistor element is secured to the top of the evaporator with aluminum
tape, and the wire is secured with a cable tie. Remove each with care.
6) Remove the thermistor wire connection (below the control box).
7) Install the new thermistor and return the refrigeration unit to its proper position in the
reverse order of the removal procedure.
8) Plug in the unit, and turn on the power supply.
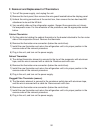
Clogged Filter Thermistor (sensor)
5) The thermistor element is secured to the condenser outlet pipe with aluminum tape,
and the wire is secured with a cable tie. Remove each with care.
6) Remove the thermistor wire connection (below the control box).
7) Install the new thermistor and return the refrigeration unit to its proper position in the
reverse order of the removal procedure.
8) Plug in the unit, and turn on the power supply.