


54
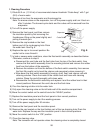
10) Secure the insulation using the plastic cable ties.
11) Connect the white thermistor connector through the bushing of the control box to the
control board WHITE K3 connector. CAUTION! Do not shorten or cut the thermistor
leads.
12) Replace the control box cover and the panels in their correct positions.
13) Turn on the power supply.
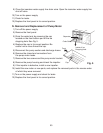
L. Removal and Replacement of Fan Motor – Remote Air-Cooled Model
Note: When replacing a fan motor, it is recommended that a new capacitor be installed.
1) Turn off the power supply.
2) Remove the remote condenser unit panels.
3) Remove the junction box cover from the remote condenser unit.
4) Disconnect the fan motor wires.
5) Remove the fan motor bracket and fan motor.
6) Install the new fan motor, connect the fan motor wires, and replace the removed parts in
the reverse order of which they were removed.
7) Replace the junction box cover in its correct position.
8) Replace the panels in their correct positions.
9) Turn on the power supply.
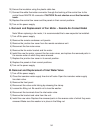
M. Removal and Replacement of Inlet Water Valve
1) Turn off the power supply.
2) Close the icemaker water supply line shut-off valve. Open the icemaker water supply
line drain valve.
3) Remove the front panel.
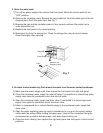
4) Disconnect the valve outlet tubing by releasing the clamp.
5) Loosen the tting nut. Be careful not to lose the washer.
6) Disconnect the terminals from the inlet water valve.
7) Remove the bracket and valve from the unit.
8) Install the new valve. Replace the removed parts in the reverse order of which they were
removed. Make sure the washer is in place in the tting nut.