


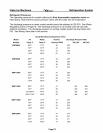

Flake Ice Machines Drive System
Page E3
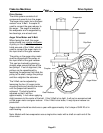
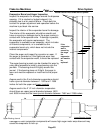
Evaporator and Internal Components
The evaporator
assembly includes the evaporator and all of its internal components. The
internal components consist of the upper and lower bearings and housings, water seal
assembly, upper and lower O-Rings, auger, and upper and lower nuts.
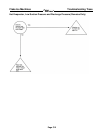
The evaporator assembly will need to be disassembled for inspection or repair if one or more
of the following conditions exist.
• Metal particles in the ice.
• Grease in the ice.
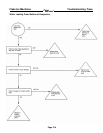
Follow the appropriate troubleshooting tree in Section C for the following symptoms before
disassembling the evaporator.
• Water leaking from the bottom of the evaporator assembly.
• Auger seizing up.
• Auger motor amp draw fluctuating more than 4/10 of an amp with proper line voltage.
• Noise coming from the evaporator assembly.
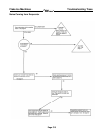
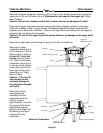
Evaporator Disassembly
It is recommended that the entire evaporator be disassembled and inspected whenever a
problem occurs in the evaporator.
Disconnect electrical power and shut off the water supply to the ice machine.
Remove the condensation cap (insulation) and ice chute from the top of the evaporator.
On EF models, remove the top panel and disconnect the wires from the secondary bin control
and remove the bin control cap tube from the brass tube.
Drain the evaporator by disconnecting the water feed tube from the float to the evaporator.
On EF models, remove the chassis from the cabinet by disconnecting the water and drain
lines and the incoming electrical at the cabinet junction box. Remove the chassis mounting
bolts and slide the chassis out of the cabinet.
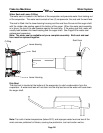
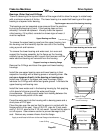
Remove the drive belt and inspect for cracks or damage.
Remove the gear reducer by removing the (4) bolts holding the gear reducer to the frame.
Inspect the spider located between the coupling halves.
Remove the upper coupling half from the auger by using a ½ wrench to loosen the 5/16 bolt
and pulling the coupler half off of the auger shaft. If the coupler half is seized to the auger
shaft, remove the bolt and spray lubricant into the bolthole. Let the lubricant soak, then use a
puller to remove the coupler half. Do not pry or use a hammer on the coupler as damage
may result.
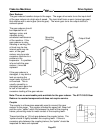
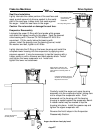
Remove the drain tube from the drip boot and remove the drip boot by pulling down on one
side and working the boot off of the evaporator lower retaining nut.