


JFT Series Technical Manual 7610-002-77-38
Issued: 03-16-2006 Revised: N/A
27
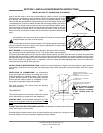
WARNING: Inspection, testing and repair of electrical equipment should be performed only by qualified service per-
sonnel. Certain procedures in this section require electrical tests or measurements while power is applied to the
machine. Exercise extreme caution at all times. If test points are not easily accessible, disconnect power, attach
test equipment and reapply power to test. When replacing electrical parts, disconnect power at source circuit breaker.
Problem: Nothing on dishmachine operates. The power switch is ON and the power indicator light is OFF.
1. Machine is not wired correctly to incoming power source. Have an electrician verify wiring.
2. Machine circuit breaker(s) is/are tripped. Reset the circuit breaker(s). If it trips again, contact an electrician to verify the
machine amp draw.
3. Service breaker(s) are tripped. Reset the service breaker(s). If it trips again, contact an electrician to verify the machine amp
draw.
Problem: Machine will not fill. The power switch is ON and the power indicator light is ON.
1. No water supply to machine. Verify that water lines have been connected to the machine.
2. Incoming water solenoid valve damaged/faulty. Verify that the valve is operating. If not, replace.
3. Water level indicators are giving a false reading. See if the green “Tank Filled” light is on. Verify the wiring of the water level
indicators and if correct, replace component.
Problem: Machine fills, but fill is weak.
1. Low incoming water pressure. Verify that incoming water pressure during fill is 20 ±5 PSI.
2. Incoming water solenoid is clogged. Verify that debris is not entrapped in valve. If so, remove debris.
3. Incoming water y-strainer is clogged. Remove Debris from y-strainer.
Problem: Low wash tank/power rinse tank temperature.
1. Verify electric booster heater is energized.
2. Low incoming water temperature. Verify that the incoming water temperature matches what is indicated on the machine data
plate.
3. Heater not energizing. Verify that the wash tank heater is operating. If not, replace.
4. Low incoming voltage. Have an electrician verify that the power coming to the machine is the same as indicated on the data
plate.
5. Heater has scale and lime build-up. Try deliming the machine. If this does not correct the problem, the heater(s) should be
replaced.
6. Check installation of flow restrictor at discharge of final rinse pump.
7. Float has failed, in the prewash tank, wash tank, and/or power rinse tank causing the unit to fill continuously
Problem: Low prewash, wash, or power rinse arm pressure, poor spray pattern.
1. Check proper installation of both upper and lower arms. Correct if necessary.
2. Clogged wash arm nozzles. Verify that nozzles are not clogged with debris. If so, remove debris.
3. Clogged wash tank or wash pump strainers. Clean out strainers if necessary.
4. Worn pump impeller. Verify status of impeller, replace if necessary.
5. Low voltage to the pump(s). Verify incoming power to the machine.
6. Motor for pump is running backwards. Most likely the incoming power leads to the motor are reversed.
Problem: Inadequate rinse.
1. Low incoming water pressure. Verify that incoming water pressure to rinse tank during fill is 20 ±5 PSI.
2. Incoming water solenoid is clogged. Verify that debris is not entrapped in valve. If so, remove debris.
3. Check final rinse pump operation.
4. Incoming water y-strainer is clogged. Remove Debris from y-strainer.
5. Clogged rinse arm nozzles. Verify that nozzles are not clogged with debris. If so, remove debris.
SECTION 4: TROUBLESHOOTING SECTION
COMMON PROBLEMS